
CloudNine Discovery Portal is the gateway to uploading, processing and reviewing your data in CloudNine Review. Follow these simple steps and your data will be available in CloudNine Review in no time.

Video: CloudNine Discovery Portal: File System to CloudNine Review (Raw data) Workflow
CloudNineDiscoveryPortal-CloudNineReview-NativeProcessing -Downloadable PDF
Step 1: File System - CloudNine Review - Unprocessed (raw) Data
Step 2: Upload to CloudNine Review: Upload Name and Case
Step 3: Select/Create Custodian and Select Data for Upload
Workflow Diagram
%20-%20Copy.png?width=688&height=524&name=FileSystem%20Raw%20(Unprocessed)%20-%20Copy.png)
Step 1: File System - CloudNine Review - Unprocessed eDiscovery Data
When you launch CloudNine Discovery Portal, you are presented with several workflows. If you have raw (unprocessed) eDiscovery data or processed data with corresponding load files, the File System - CloudNine Review workflow is used.
- Double-click the CloudNine Discovery Portal shortcut to launch CloudNine Discovery Portal. The Welcome to CloudNine Discovery Portal screen appears.
- On the Welcome (Home) screen, under Select Data From: choose the first option, File System (e.g., File Share, Hard Drive, Forensic Image, etc).
- When File System is selected, the Review Data Using: options become available. By default, CloudNine Review is selected. Verify the Select Data From: File System and Review Data Using: CloudNine Review is selected, then click Continue.

- At this time you are prompted to log in to CloudNine. Enter your Email address and Password used to log in to CloudNine Review, then click Continue.

- The Verify Your Identity using AuthO Guardian app pop-up appears. Select the option you have in place for CloudNine Review multi-factor authentication method and verify. See Creating Your Multi-Factor Authentication to learn more about multi-factor authentication.

- Once your identity is verified, the What kind of data are you uploading? overlay appears. There are four options:
- Native/Raw data: Data that has not undergone any processing to expand container files, extract metadata, extract native files, or extract text files. This is eDiscovery data in its original collected format.
- Production/Processed data: Data has undergone processing and contains the corresponding .DAT load files for metadata, along with links to the native and text files. If images exist, a .LFP or .OPT file is available for image uploads.
- UFDR Cell phone data is provided in a UFDR file, a summary report of data collected from a smartphone or other smart devices.
- Modern Data Load File: Data collected from cell phones, group messages, social media, etc and provided in a delimited load file format such as a CSV or DAT file.

Step 2: Upload to CloudNine Review: Case Selection and Upload Name
After launching the CloudNine Discovery Portal, connecting to CloudNine Review, and selecting the data upload type (Native/Raw Data), the next screen is Upload to CloudNine Review: Select a CloudNine Review Case. On this screen, you enter an Upload Name and select an existing CloudNine Review case (project). A new CloudNine Review case (project) can also be created here.
Overview: Upload to CloudNine Review
Upload to CloudNine Review - Existing Case
Create a New CloudNine Review Case
Overview: Upload to CloudNine Review

- Upload name (Required): Enter an Upload name to use as a reference for the upload. The maximum number of characters is 100. This information is captured in the Upload Name field in the CloudNine Review Project.
- Case Name: Lists all CloudNine Review projects you are enrolled in as an Admin.
- Search Cases...: Use this option to search and locate a CloudNine Review case (project). The search is fuzzy and begins returning case names that relate to the character(s) entered in the search box.
- Create Case: If the case does not already exist in CloudNine Review, you can Create a Case through CloudNine Discovery Portal. The case is temporary and not created in CloudNine Review until data is received in the CloudNine Review environment.
- Case Name (Required): List of CloudNine Review cases you have Admin rights to access and load data.
- Selected: When the case is selected, it is highlighted, and a checkmark appears in the Selected column.
- Home: Returns you to the Welcome screen.
- Next: Advances you to the next screen, Step 3: Select Data for Upload.
Upload to CloudNine Review - Existing Case
Now that you are familiar with the Upload to CloudNine Review screen, you can proceed with entering an Upload name and selecting the Case to which the data will be loaded.
- Enter the Upload name. The Upload name should follow the naming policy you have implemented for uploading data to CloudNine Review.
- Select the CloudNine Review case from the Case Name list.
- Use the Search Cases... option to quickly find your desired case; the fuzzy search updates the list as you type.
- Create Case: Use this option if the case is not listed and you have verified the case is a new case and does not exist in CloudNine Review.

- Once you have entered the Upload Name and selected the CloudNine Review Case, click Next to advance to Step 3: Select Data for Upload.
👥 You must have Admin rights in the CloudNine Review case (project) you wish to upload to. If you do not have Admin rights, the case does not appear in the Case Name list.👥
Create a New Case in CloudNine Review
It is possible to create a CloudNine Review case through CloudNine Discovery Portal.
When creating a new case through CloudNine Discovery Portal:
- In CloudNine Review, verify the case does not exist. It may be that you do not have the correct permissions to upload data to the case. When importing to an existing case (project) you must have admin rights to that project.
- Confirm you have access rights to create a case in CloudNine Review. To create a new case you must have admin or user rights.
- Maintain the Case naming policies you have implemented for CloudNine Review.
- A CloudNine Review case created through CloudNine Discovery Portal is temporary, the case is created in CloudNine Review when the upload process completes and the data is received by CloudNine Review.
- On the Upload to CloudNine Review screen, click the Create Case button on the right.

- The Create new case overlay appears.
- Case Name (Required): Enter a name for the CloudNine Review case, based on your CloudNine Review case naming policy.
- Time zone: If the default is incorrect, select the correct time zone from the drop-down.
- Click Create to create the case.

The case is now found under the Case Name list and is selected by default. The case appears italicized, indicating it is temporary and will only be created upon receiving data by CloudNine Review.
- Enter the Upload name, confirm the Case selection, and click Next to proceed to Step 3: Select Data for Upload.
Step 3: Select/Create Custodian and Data for Upload
On this screen, you will select or create the custodian, select data for upload, and optionally add a password list file.

- Select/Create Custodian: Here, you will choose the custodian for the data you are loading or select Create New from the drop-down, then enter the Custodian name. Only one custodian can be assigned to the data selected for upload.
- Select Data for Upload, choose the data to upload to the CloudNine Review case. Select folder/files using either of the following options.
- Drag and drop any number of files and folders into the area marked Drag files & folders here to add files.
- Select the Browse... drop-down and select either Add files... or Add folders... to navigate and select the files/folders you wish to upload to CloudNine Review. Once selected, choose Open (files) or Select Folder (folders) in the bottom right corner.

Once folders or files are selected, each file is listed. To view the entire path and file name, hover your cursor over the file. To remove a file, select the file and click the trash can icon to the right. This file is removed from the list and will not be included in the upload.

- Password List: Browse to upload a text file that contains a list of known passwords. Once the files reach CloudNine servers and processing begins, the password list is used on password-protected files found in the dataset.
You have the Custodian, selected files and/or folders for upload, and optionally selected a password list. Click Next to advance to Step 4: Pre-Upload Filtering.
Step 4: Pre-Upload Filtering
The Pre-Upload Filtering screen allows you to inventory and analyze your data before uploading.
You can cull data by folders, file type, specific files, or date range to exclude it from processing and uploading to CloudNine Review.
Overview of Pre-Upload Filtering
No (default) - I do not want to cull data prior to processing
💡 Use the Pre-Upload Filtering to obtain preliminary reports about the data. This information can be useful for determining the priority order based on the folder/directory structure and for identifying any pre-upload exclusions (culling) that may be implemented based on file type or date range filtering.
Overview of Pre-Upload Filtering

- Yes: An inventory of the data files is performed based on their file extensions.
- Use Enhanced file type identification: This option inventories files based on the unique signature (file header) instead of the file extension.
- No: Selected by default, data will not be inventoried, and culling options will not be available. All selected files are uploaded.
- Next: Takes you to the next screen. If you select Yes, the next screen is the Source selection overlay, then the Pre-upload filtering screen. If you chose No, you are directed to the Step 5: Confirm & Upload page.
No (default): I do not want to inventory and/or cull data prior to processing
Pre-upload filtering is an optional feature available to you, but it is not necessary. If you are familiar with your data and do not want to exclude anything, you can proceed directly to the final step, bypassing inventory and filtering.
- Under Do you want to cull data prior to processing, enable No (selected by default).
- In the bottom right, click Next to proceed to the Step 5: Confirm & Upload screen.
Yes, I want to inventory my data and determine if any filtering will be performed before the upload
The Pre-Upload Filtering feature in CloudNine Discovery Portal allows you to inventory your data and exclude files based on folders, file types, individual files, and date ranges before the upload process begins. Excluded files will not be uploaded or processed in CloudNine Review.
Inventory your Data
- On the Pre-Upload Filtering screen, under Do you want to cull data prior to processing, select Yes - the default option is to inventory by file extension.
- When Yes is selected, the default option is to inventory by file extension. While this is the quickest method for file type inventory, it may not be accurate as it relies solely on the file extension.
- Use Enhanced file type identification: This provides a more accurate method of file inventory. It examines the file's unique header signature for accurate type identification, rather than relying on the file extension. With this feature selected, inventory time will take longer, but the results of the file-type inventory will be more accurate.

- You have already selected Yes to inventory your data. Now, choose if you want to Use Enhanced file type identification (increases inventory time), then click Next at the bottom right to move to the Source Selection Progress overlay.
Source Selection Progress
The Source Selection Progress overlay indicates the inventory process has initialized. As files are retrieved, information about the inventory progress is displayed.

If the information appears to be inaccurate at any time, or if you decide to stop the inventory process, click the Cancel Selection ![]() button located at the bottom right to cancel the process. If you choose to cancel, you are returned to the initial Pre-Upload Filtering screen. At this time, you can go Back to select/remove data or choose a different inventory option. When the inventory process completes, the Pre-Upload Filtering Inventory Results screen appears.
button located at the bottom right to cancel the process. If you choose to cancel, you are returned to the initial Pre-Upload Filtering screen. At this time, you can go Back to select/remove data or choose a different inventory option. When the inventory process completes, the Pre-Upload Filtering Inventory Results screen appears.
Pre-Upload Filtering Inventory Results
Once the file inventory process completes, the Pre-Upload Filtering screen displays the results. At this time, you can review the data and determine if you want to Cull (exclude) any data before uploading. There are three tabs on the Pre-Upload Filtering Screen:
- Folders/Directory: Select or deselect entire folders from your dataset. Folders containing files are selected by default.
- Date & File: On this tab, you can 1). Filter by file type, 2). Apply a date range, and/or 3). Select/deselect by individual file(s).
- Mailstore: Review PST files and their content. You will need to visit the Mailstore tab at least once after the inventory completes to retrieve Mailstore data.
Folders/Directory
The Folders/Directory tab displays the directory structure and folders identified during the inventory process. By default, all folders are selected to include in the upload.

- Tabs: The three tabs provide various culling options for Folder/Directory, Date & File, and Mailstore.
- Folder name: Displays the directory structure of the selected data. All folders found are listed, along with the number of files contained in the folder.
- Include: Indicates what folders are included for the upload. By default, all folders are checked to include during the import process. De-select (uncheck) an entire folder or subfolder to exclude from the upload.
💡 Want to start reviewing sooner? Consider uploading in "batches" by including/excluding specific folders based on size or priority. For example, if the directory is organized by custodians, then you can prioritize which custodian to import first.
- Review Folder information and de-select (uncheck) any folders you do not want to include during the import.
- After excluding any folders/subfolders from the upload, click Next or select the Date & File tab.
Date & File
On the Date & File tab, you can choose to exclude files by File Type, Individual Files, or Date Range.
File Type and/or File Filtering
Overview Date & File Tab
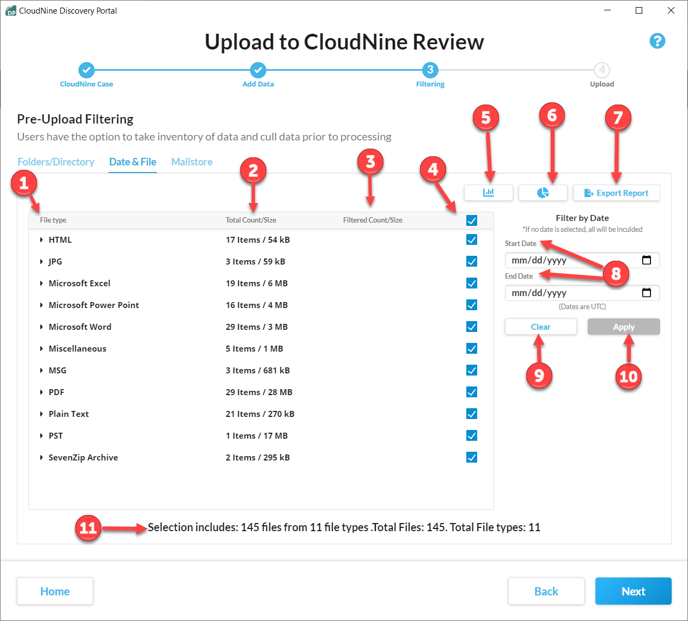
- File type: Lists all file types identified during inventory. Click on the file type to expand and see the list of files. If you are unable to see the entire path and filename, hover over the file to display the remaining path and filename.

- Total Count/Size: The number of files and total filesize for that file type.
- Filtered Count/Size: When a date range filter is applied, this column displays the number of files and total size for the specified file type that fall within the selected date range.
- Include Indicator: Indicates if files or file types are included. Indicators are:
 All file types and files will be included in the upload.
  Indicates some file types or files have been excluded.
 Indicates the file or entire file type is excluded.
- File Type Statistics: Provides a summary of the selected sources after any exclusions.

- Filesize Statistics: Provides statistics of the included file sizes.

- Export Report: Select Export Report and then choose either or both of the Available reports to export. There are two types of reports:
- Metadata Report: Generates a CSV file of all included files for upload, detailing their File Path, Name, Extension, Type, Size, Created Date, Last Access Date, Last Modified Date, and Attributes.
- File Type Report: A PDF file with information on the file types that are selected for upload. The report includes a Description, # of Files, the Total Size (GB), the Oldest Creation Date, the Newest Creation Date, the Percentage of the Total File Count, and the Percentage of the Total File Size.
- Select the report(s) and output location. Once the reports are complete, click the 'Click Here' option to open them.


- Filter by Date: If the scope of your project requires a date range filter, enter a Start and End date to upload data that falls within the selected date range. Data outside the date range is excluded from the upload.
- Clear: Clears the date range filter.
- Apply: Applies the date range filter.
- Selection includes: Provides a summary of the number of files and file types included with the upload. This is updated as files or file types are excluded.
File Type / File Filtering
The File Type column lists all top-level file types from the inventory, allowing you to exclude either entire file types or specific files. This feature is often used to exclude executable files and common system files.
If you are excluding file types, it is recommended that you use the Enhanced File Type Identification to ensure better accuracy when excluding specific file types.
File Type Filtering
- Review the list of file types identified during the inventory process. By default, all files are checked to Include during the import.
- Clear (un-check) the file type to exclude all files identified for that file type. Notice the "include" box is now cleared, and Selection Includes... is updated to reflect the change.
Individual File Filtering
- Click the expand
 button next to the file type to see a list of the individual files associated with that file type.
 - If needed, hover your mouse over any file to see the entire path and filename.
- Clear (un-check) all files you wish to exclude from import. In the Include column, the Include header changes to reflect files that have been excluded. At the bottom, the Selection includes.... updates to reflect the changes.

Date Range Filtering
The Filter by Date option on the right is used to include only files that fall within the specified date range.
💡 Use Data Analysis tools to export a Metadata report to review date fields and determine any date range filter to implement. 
To specify a date range, do the following:
- In the Start Date box, click on any part of the mm/dd/yyyy and begin typing to enter a starting date or click the calendar icon to the right to open the calendar option. With the Calendar window open, select a date to use as the starting date.
- Click the Month/Year shown in the calendar header to scroll between years rather than months/days.
- Click 'Today' at the bottom right of the calendar window to set today's date as the starting date.


- Type the Start and End Dates, or use the Calendar option to select the dates. Once populated, click the Apply button to filter all files by the specified date range. Once applied, you will see a Filter Applied status. The Filtered Count/Size column is updated to reflect the number of files and sizes that fall within the date range and will be included during the upload.
- Use Clear to remove the applied date range filter. All files will be included for upload again unless excluded by file type or file filtering.

The following File types are Not filterable (as shown in the Filtered Count/Size column). By default, these file types are included. You can manually deselect to remove from upload.
|
|
|
|
|
|
|
|
|
|
|
|
For PST mailstore files, the effects of the Date Filter can be reviewed on the Mailstore tab.
Mailstore Filtering
The Mailstore tab provides an opportunity to review PST files located within your data set. On this tab, you will see a list of PSTs, the number of messages, and the total file size. When you expand the top mailstore folder, you can see the folder organization of the mailstore.
If one or more PST files are found to be corrupt, you will be notified at this time and can troubleshoot the problem.
Mailstore Overview
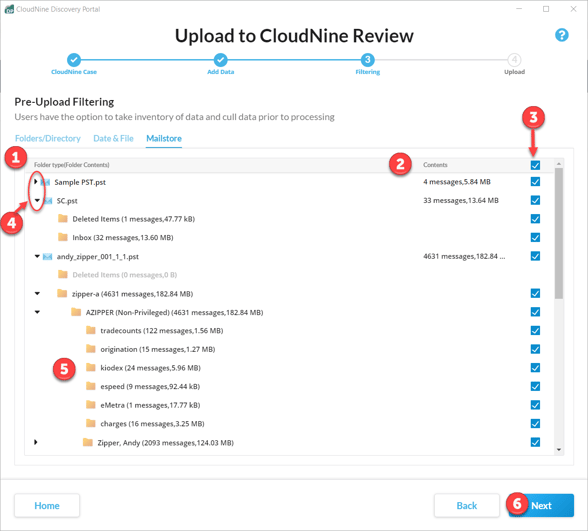
- Folder type (Folder Contents): Lists all PST mailstores in the dataset.
- Contents: The root mailstore displays the number of messages in the PST as well as the size of the data.
- Included/Excluded: Indicates if the folder and its contents will be included in the import. There are three status indicators:
-
 Included: Everything is included in the selection.
  Excluded folder: The entire email folder is excluded from the upload.
  Partial Include/Exclude: Some folders in the mailstore are selected for import or excluded.
-
- Expand / Collapse: Expand a PST mailstore to see the folder structure and organization of the mailstore. Collapse to return to the top folder.
- Folders: The folder organization of the PST.
- Next: Select and move to the Confirm & Upload page.
Review PST Folders
- On the Mailstore tab, review PSTs, Folders, and Content information. Identify and deselect any folder(s) that should be excluded from the import. If previously marked to exclude, click to include again.

Your data has been inventoried, and you have gained insight into the data you will be uploading to CloudNine Review. Filter options are applied based on the scope of your project. Click Next to proceed to Step 5: Confirm & Upload.
Step 5: Confirm & Upload
The Confirm & Upload screen is your chance to review information about the data that will be uploaded.

- Uploading From: File System - Provides information about the number of files selected for upload and the total size of the upload, excluding any file expansion.
- Uploading to: Displays the CloudNine Review Case, Upload Name, and Custodian Name, to which the upload will go.
- Selected Items - PST and Folders (visible if inventory performed): Provides a summary of the PST mailstores selected for upload.
- Selected Items - Other File Types (visible if inventory performed): This option provides a summary of the file types that will be included for import.

- Notes & Comments: Optionally, type information about the upload here.
- Start Upload: Initializes the upload.
Confirm &Upload
- Verify Uploading From, Uploading To, and Selected Items information is correct. Enter optional Notes and Comments about the project.
- If changes are needed, go Back to make any necessary adjustments to your document selections and filters.
- Click Start Upload to begin. The upload process is initialized and monitored on the Global Monitor Console.
Global Monitor Console
The Global Monitor Screen is used to monitor the upload progress through the CloudNine Discovery Portal. Once data is uploaded to CloudNine servers, the status on the Global Monitoring Console will reflect that the upload is complete, and processing will begin for the CloudNine Review phase. You will receive status emails during processing, with a final email advising your data is ready in CloudNine Review. Click Global Monitor Console for additional information about the console.
