
When importing metadata using the Import system within CloudNine Analyst, attachments need to be mapped to their evidence source. This is done using two (2) fields: Attachment(s) and Attachment Path. They work in conjunction with each other to properly map each attachment to an item.
When working with metadata that has an attachment (or multiple attachments), it first must be uploaded to an evidence container.
See “ Creating an Evidence Container ” for more information on how to create an evidence container, followed by “ How to Upload Files to an Evidence Container” for details on this process.
So now that you have your evidence container created and your attachments synchronized to that container, you are now all set to go with the importation of your metadata.
During the import process, you will see a dropdown that allows you to select your target evidence container.

Select the desired evidence container from the list. This will be where ALL of the files associated with the specific import reside. This should be the same container to which you synchronized your files using ESI Sync. If not, the attachments will report “(file not available)”.
Now that your files are present in the system within an evidence container your load file will need to contain references to these files using the relative path within the evidence container (Attachment Path) and the file names for each attachment (Attachment(s)).
Attachment Path
Your Attachment Path is the relative path to the file and should start with the parent folder for the desired attachments. If the attachments are all uniquely named, they can reside within a single folder, otherwise, you will need to subfolder them so that they do not overwrite each other.
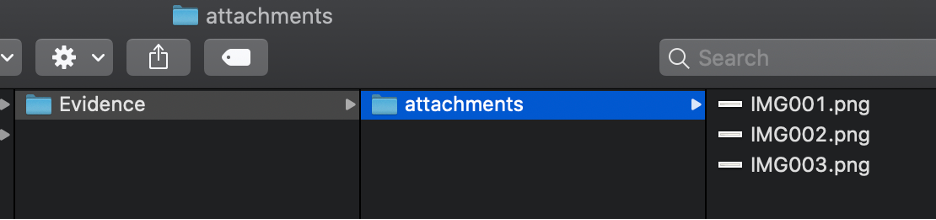
For example, let’s say we have 3 attachments: IMG001.png, IMG002.png, IMG003.png. Each of our files is located in a folder called “attachments”. During synchronization, we selected the parent folder “Evidence” to be synchronized to our evidence container. In this case, for each of the images, our relative path would be:
“attachments”
If the items were each nested within subfolders, the relative path would include that subfolder.

Using the screenshot above as an example, our relative path for the images would now be:
“attachments/item_1”
For each metadata item uploaded, there can only be one (1) relative path to attachments for each item, as the system does not support multiple relative paths per item. However, an item can have multiple attachments.
Attachment(s)
For instance, if we had an item and this item had 3 attachments, we would then provide the relative path (Attachment Path) and each of the files attached as a semicolon-delimited value. In the above case the value provided for Attachment(s) would be:
“IMG001.png;IMG002.png;IMG003.png” with an Attachment Path of “attachments/item_1”
Example log warning:
“Warning: AC01-EM-00000094: The attachment IMG001.png was provided without an attachment path reference. File located in attachments/item_1 folder within referenced Evidence Container. Re-sync the Evidence Container if this is incorrect.”
If your relative path is provided, but the item was not found, you will receive the following warning:
“The attachment IMG001.png provided does not exist in the evidence folder with the relative path provided of attachments/item_1. Please re-sync the Evidence Container to ensure directory structure is correct."
Important: Items without any Attachment Name and only an Attachment Path will result in no attachment being loaded, as without an Attachment Name the Attachment Path will not be searched for the item.