
CloudNine Discovery Portal's Pre-Upload Filtering option can be used to perform a preliminary assessment of your data before uploading to CloudNine Review. With this feature, you can see the directory/folder structure, learn file types, and generate basic metadata reports. This information can be helpful for examining the data you have received and determining how best to upload the data, such as priority processing, file type filtering, and date range exclusions.
CloudNine Discovery Portal's PreUpload Filtering is available when you choose the File System - CloudNine Review -Native/Raw Data workflow. This article focuses on obtaining file statistics and reports, not the full upload workflow. For detailed steps on uploading data refer to the How do I process data to CloudNine Review article.
CloudNine Discovery Portal's Pre-Upload Filtering for Data Statistics and Reports:
- Launch CloudNine Discovery Portal, you will be on the Welcome page.
- Choose File System (e.g. File Share, Hard Drive, Forensic Image, etc) from the Select Data From:. section.
- Under Review Data Using: CloudNine Review should be selected.
- Click Continue.
- You are prompted to Login to CloudNine. Enter the Email address and Password you use to log in to CloudNine Review then click Continue to Verify Your Identity with the two-factor authentication method you have in place for CloudNine Review.
- The What Kind of data are you uploading? popup appears. Select Native/Raw Data, then OK.
- You are on the Select a CloudNine Review Case. Enter a Custodian name and select the CloudNine Review Case Name then click Next.
- Note: Even though you only want to perform a preliminary inventory, the Custodian name and Case Name are required to advance to the next screen.
- You are now on Select Data for Upload. Drag/Drop the root folder of the data or click Browse... to select Folders or Files for import. All files found within the directory are listed individually in the File list. If desired, add additional folders/files. Then click Next.
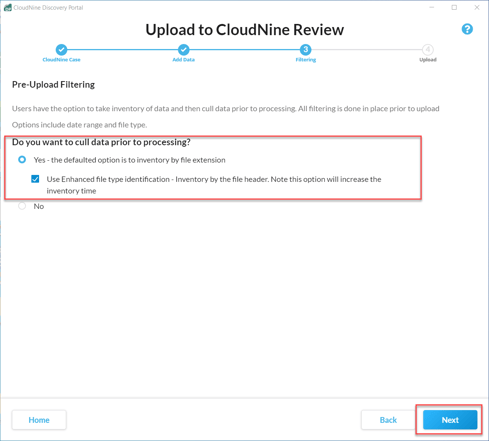
- On the Pre-Upload Filtering screen under Do you want to cull data prior to processing, select Yes - the defaulted option is to inventory by file extension.
- When Yes is selected, the Use Enhanced file type identification - Inventory by the file header is available for selection. Click the box to enable this feature and then click Next. While slower, this option uses the file header to identify the file type instead of the extension and offers a more accurate result.
Source Selection Progress
The Source Selection Progress overlay indicates that the inventory process has initialized. As files are retrieved, information about the inventory progress is displayed. 
Once the File Retrieval completes, CloudNine Discovery Portal will begin Performing Enhanced File Type Identification. 
If at any time the information appears to be inaccurate, or you decide you want to stop the inventory process click the Cancel Selection ![]() button on the bottom right to cancel the File Type Identification. If you choose to cancel, you are returned to the initial Pre-Upload Filtering screen. At this time, you can go <Back> to select/remove data or simply choose a different inventory option. When the file identification process completes, the Pre-Upload Filtering screen appears.
button on the bottom right to cancel the File Type Identification. If you choose to cancel, you are returned to the initial Pre-Upload Filtering screen. At this time, you can go <Back> to select/remove data or simply choose a different inventory option. When the file identification process completes, the Pre-Upload Filtering screen appears.
Pre-Upload Filtering Inventory Results
Once the identification process completes, the Pre-Upload Filtering screen displays the results. There are three tabs on the Pre-Upload Filtering screen: Folders/Directory, Date & File, and Mailstore.
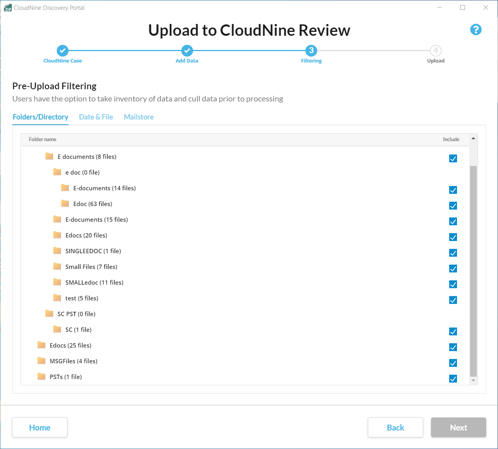
Folders/Directory
The Folders/Directory tab (pictured above) displays the directory structure and folders identified during the inventory process. Here you can see how the data is organized and if there is a way to upload data in batches instead of all at once. For example, if you received a hard drive of data that is organized by custodian you might choose to upload to CloudNine Review in batches based on the Custodian priority level. This allows data to reach CloudNine Review faster so you can start reviewing sooner.
Date & File
The Date & File tab lists all files by file type and can be used to filter file types and by date. Here you can see the number of files and pre-processing size. You can view File Statistics and Export Reports. This information can be helpful to determine exclusions based on File Types and date ranges.

File Statistics
There are two types of file statistics charts you can view: File Type and File Size. These can be useful when determining potential exclusions based on specific file types and the overall size of the type. For example, if executable file types exist you can see what the total size is and can determine if you want to import that file type.
- File Type: Click the File Type option
 to view File type statistics. Here you can see the breakdown by file type and the percentage as it relates to the selected data. Scroll up or down to see all file types. Click OK to close the popup.

- File Size: Select the File Size
 option to view statics based on file size. Filesize Statistics graph appears and displays the overall file type size percentage of selected data. Click OK to close the Filesize Statistics popup.
Export Reports
There are two types of reports that can be generated: Metadata and File Type. The Metadata report is a CSV containing basic metadata for all files. The File Type is a PDF with charts organized by file type for all files.
- Click the Export Report
 button on the Date & File tab.
 - The Select the reports to generate and their output path popup appears. Click the box next to the Available reports to select both reports.
- Copy/paste or use the Select Path option to choose the Output path for reports.

- Click OK to generate reports.
- The Source Selection Reports Generation appears and populates as the reports are successfully generated.

- Use the Click Here option to view the report. Or, click OK to close the popup. You can then browse to locate and view the reports.
Metadata Report
The Metadata report provides basic metadata information, from the properties for all top-level source files. If the Source Selection Reports Generation popup is still open, select Click Here to view the Metadata Report. If you closed the popup, browse, locate, and open the file. The Metadata Report is a CSV file and can be opened in Excel or any Text Editor program. The metadata fields provided are:
- File Path: Full path to the folder the file resides in.
- File Name: Original file name and extension.
- File Extension: The original file extension.
- File Type: Actual file type when Enhanced File Type is selected and run.
- File Size: Size in bytes of the file.
- Created Date: Created date and time.
- Last Accessed Date: Date and time the file was last accessed.
- Last Modified Date: The date and Time file was last modified.
- Attributes: Values located in the Attributes section of the file properties.

File Type Report
The File Type Report is a PDF file providing information for all file types. This report includes:
- Description: File type description if identified.
- Files: The number of files for that file type.
- Size (GB): Total size of files for that type.
- Oldest Creation Date: Oldest file creation date for the file type.
- Newest Creation Date: Newest file creation date for the file type.
- Totals: Total for each column.

In addition, charts are provided that include the Percentage of Total Files and Percentage of Total File Size.


Report counts are for top-level source files. Files are not expanded, if you have mailstores, forensic files, archive files, etc the actual upload and processed record count will increase. These are preliminary reports designed to assist in identifying any pre-process filtering options.
Mailstore
When you click the Mailstore tab, CloudNine Discovery Portal will load all mailstores included in the source selection. Here you will see a list of all mailstores and can expand the mailstore to see the folder organization within the mailstore and where emails reside. This can be useful when gathering information about your data and determining how you want to process the data.
