
When cell phone data is collected, the investigator will often provide a UFDR file which is a summary report of data collected from smartphones or other smart devices. Import modern data into CloudNine Review using the CloudNine Discovery Portal - CloudNine Review workflow.
CloudNine Discovery Portal Welcome Screen
CloudNine Discovery Portal's Welcome screen is where you choose your CloudNine Discovery Portal workflow.
- Launch CloudNine Discovery Portal.
- 📄 CloudNine Discovery Portal automatically verifies the version, if a new version is available it will update to the latest version.
- You are on the Welcome to CloudNine Discovery Portal screen. There are two columns on the welcome screen: Select Data From and Review Data Using. This screen initializes the Modern Data Data workflow. Under Select Data From: Choose File System (e.g. File Share, Hard Drive, Forensic Image, etc).
- Under Review Data Using: Select CloudNine Review.
- Click Continue.

- The Log in to CloudNine Review screen appears. Enter the Email address* you use to log in to CloudNine Review, then click Continue.
- Enter your Password* for CloudNine, then click Continue. You are prompted to Verify Your Identity with the two-factor authentication method you have set up in CloudNine Review.


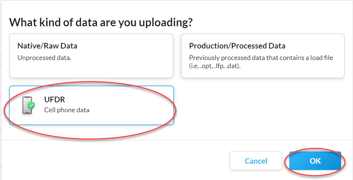
- The What kind of data are you uploading screen appears. Choose UFDR Cell phone data, then click OK to advance to the Select a CloudNine Review Case screen.
Select a CloudNine Review Case
On the Select a CloudNine Review Case you will Enter a Custodian name, select an existing CloudNine Review project from the Case Name list, or Create Case.

- Under Custodian name*, enter the Custodian for the UFDR file.
- Case Name: Under Case Name you will see a list of all CloudNine Review cases (projects/databases) in which you have Admin rights. Select, by clicking on the case name you are uploading to. The Case Name is highlighted and a check appears in the Selected column.
- If you are loading to a new project, select Create Case. On the Create New Case screen, enter a Case Name, and Time Zone, then click Create.

- Once created, the Case name list shows the case italicized and selected by default.

- If you are loading to a new project, select Create Case. On the Create New Case screen, enter a Case Name, and Time Zone, then click Create.
- After entering a Custodian Name and selecting a Case Name, click Next to advance to the Select UFDR File For Upload.
Important Information about Case Selection and Create Case.
👥 The Case Name list will only show CloudNine Review projects you have been assigned Admin rights to.
✔️Before creating a New Case, check CloudNine Review and verify the project does not already exist. It may exist, but you may not have the correct permission to load data.
📄A CloudNine Review case created through CloudNine Discovery Portal is temporary, the case is created when the data is uploaded and received by CloudNine Review.
👥 You must have Admin or User rights to Create a new case. When the New Case is created, the user creating the case will be an Admin to that CloudNine Review project.
💡 Develop a naming policy for your CloudNine Review Projects. An example might be Matter Number - Matter Name.
Select UFDR File For Upload
On this screen, you will choose the path to the UFDR file you wish to load and enter the Evidence Container Name.

- Click Browse... to browse and select the UFDR file you want to load to CloudNine Review.
- Enter an Evidence Container Name. The Evidence Container Name is often the device name, make, model number, or combination of all three and is used to uniquely track the evidence loaded to CloudNine Review.
- Click Next to advance to the Import Settings screen.
Import Settings
On this screen, you will identify your Import Settings and Control Number Settings for the selected UFDR file.
Import Settings Overview

- Mobile Number* (Required): Enter the mobile number of the device from which the UFDR file was created.
- Processing Options: Select options, specifically a date range, to only include data items within the date range.
- Do Not Import: Exclude File attachments larger than X MBs. Enabled, any attachments larger than the specified file size are excluded from the import.
- Import Type* (Required): The communication data type(s) you wish to import. Only the checked items are imported to CloudNine Review.
- Prefix: An alphanumerical string of characters (20 max) to use at the beginning of each data item. The prefix is the same for all data items imported from the selected UFDR file.
- Length: The character length (numerical) of each Item Number, with a minimum of 4 and a maximum of 24 characters. Leading zeros are used to pad the number to the number of characters selected.
- Example Control No: Illustrates a sample of how the control number will appear.
- Start No: The number the data starts with.
- Separator: The separator between the Prefix, Import Type, and Numeric value.
- Home: This takes you to the Welcome screen, all settings and selections will be lost.
- Back: Goes back to the previous screen.
- Next: Advances to the next screen.
Select Your Settings
- Under Import Settings, enter the Mobile Number for the UFDR file and select the Import Type(s) you wish to import. You must select at least one communication type. These are the required import settings. Optionally, choose any remaining import options.
- Under Control Number Settings, enter a Prefix, Start No, and Length.
- Prefix: It is best practice to implement a prefix in your numbering. The prefix can be used to help maintain unique control numbers, as well as locate items in the database.
- Start No: If using the same prefix throughout the project, the Start No will need to be the next sequential number in the database to prevent duplicate numbering.
- Length: The industry standard is 8-10 characters.
- Once you are happy with the selected settings, click Next to proceed to the Confirm & Upload screen.
Confirm & Upload
The Confirm & Upload is your last chance to review upload data and settings.

- Uploading From: Indicates the data type being uploaded. The Total files selected for upload: is 1 for Modern Data, either the UFDR or Slack .JSON file.
- Uploading To: The CloudNine application selected to upload the data, in this case, CloudNine Review. This section will display the CloudNine Review Project Name, Custodian, and Evidence Container Name.
- Control Number Setting: Shows the Prefix, Length, Separator, Start No, and an Example of the starting number assigned to the data.
- Import Settings: The Mobile Number you inputted and the Import Type(s) you selected.
- Back: Takes you to the previous screen.
- Start Upload: Initializes the upload to CloudNine Review.
Once you have reviewed your data and are happy with your settings, click Start Upload to begin the upload process.
Global Monitoring Console
The Global Monitoring Console launches and shows the progress of the upload.

Select Global Monitoring Console for more information.
📄 The Global Monitoring Console provides a status of the data upload process only. A Green check mark indicates the data is successfully uploaded to the CloudNine Review servers.
Once the data successfully uploads to CloudNine Servers, you will receive an email from CloudNine Review indicating the data is received and being processed. When processing completes and your data is ready, you will receive a second email.