
Use the CloudNine Concordance - CloudNine Review workflow in Discovery Portal to migrate Concordance databases into CloudNine Review.
Step 1: Selecting CloudNine Concordance to CloudNine Review Workflow
Step 2: Select the CloudNine Review Case
Step 3: Select the Concordance Data
Step 1: Selecting CloudNine Concordance to CloudNine Review Workflow
- Launch CloudNine Discovery Portal to access the Welcome screen.
- Select CloudNine Concordance from Select Data From, CloudNine Review is selected by default and is the only option available for Review Data Using.
- With CloudNine Concordance and CloudNine Review selected, click Continue.

- The login to CloudNine Discovery Portal prompt appears. Enter the Email Address and Password you have for CloudNine Review, then click Continue. The Verify your Identity prompt appears. Verify your identity using the two-factor authentication method you set up in CloudNine Review.


Step 2: Select the CloudNine Review Case
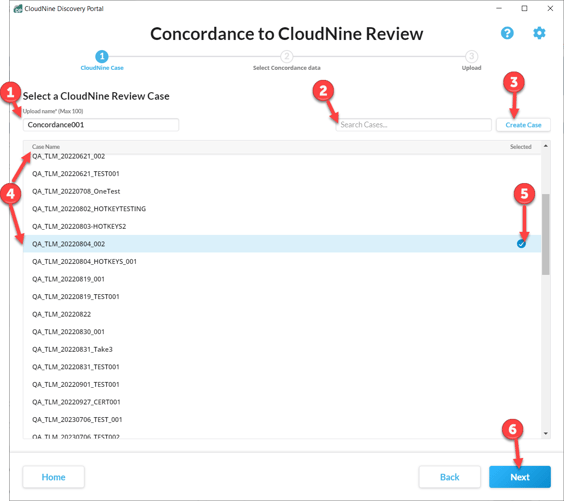
You are now on the Select a CloudNine Review Case screen. Here you will enter an Upload name and select the Case Name of the CloudNine Review Case (project) you wish to upload the data to. If the case does not already exist, you can create a temporary case through CloudNine Discovery Portal that is created in CloudNine Review when the data is received.
Overview
-
Upload name (Required): The Upload name is used for reference to track the upload. The Upload name should be unique and should follow the naming policy you have in place.
-
Search Cases..: When you have a long list of CloudNine Review cases (projects) use this feature to locate the case quickly. Searches are fuzzy and will begin returning results as you enter characters.
-
Create Case: If the CloudNine Review case (project) doesn't exist you can create the case in CloudNine Discovery Portal. If a case is created in CloudNine Discovery Portal it is temporary. It is not created in CloudNine Review until the data is received by CloudNine Review.
-
Case Name: Lists the CloudNine Review cases (projects) you have administrative rights.
-
Selected: A check mark indicates the case is selected.
-
Next: Advances you to Step 3: Selecting the Concordance Data.
Select Existing CloudNine Review Case
- On the Select CloudNine Review Case screen enter an Upload name.
- Scroll or use the Search option to locate the existing CloudNine Review case (project). Left-click your mouse to select the case. The Case is highlighted and a checkmark appears under the Selected column.

- Click Next to advance to Step 3: Selecting the Concordance Data.
👥You must have Admin rights to the CloudNine Review Case (Project) to load data. If you do not have Admin rights, the case does not appear in the Case Name list. 👥
Creating a New Case for CloudNine Review
If the case is not found in the Case Name list, and you have confirmed the case does not exist in CloudNine Review it is possible to create a new case (project) via CloudNine Discovery Portal.
Before you create a CloudNine Review case in CloudNine Discovery Portal:
- In CloudNine Review verify the case (project) does not already exist.
- You must have Admin rights to the CloudNine Review case (project) to load data. If you are not an Admin, the case will not appear in the Case Name list in CloudNine Review.
- Verify your user permissions for CloudNine Review. You must have Admin or User permissions in CloudNine Review to create a case (project) and load data via CloudNine Discovery Portal.
- Maintain the Case (project) naming policies you have implemented for CloudNine Review.
- When a CloudNine Review case is created via CloudNine Discovery Portal the case is temporary. The case is not created until the data is received by CloudNine Review.
- On the Select a CloudNine Review Case screen, click the Create Case
 button at the top right corner. The Create New Case popup appears.
 - Under Case Name, type the desired name for the CloudNine Review project. The case name should follow the naming policies you have in place for CloludNine Review.
- Review the default Time Zone, if the Time Zone is not correct use the drop-down to select the time zone for the project.

- Click Create. You are returned to the Select a CloudNine Review case, the case appears in italics and is selected by default.

- Proceed by entering the Upload name, verify the newly created Case is selected, then click Next to advance to Step 3: Select Concordance Data for Upload
⚠️When creating a CloudNine Review case in CloudNine Discovery Portal, the case is temporary. The case (project) is created when the data is received by CloudNine Review. At that time you will see the project in CloudNine Review.
Step 3: Select Concordance Data for Upload
You have selected the CloudNine Concordance - CloudNine Review workflow, entered an Upload Name, and selected the CloudNine Review Case it is now time to select the Concordance Data you wish to upload.

- Enter, Copy/Paste, or Browse... to select the Concordance Folder Path where the database, supporting files, images, natives, and text exist.
- Click Next to advance to Step 4: Confirm & Upload.
Step 4: Confirm & Upload
The Confirm & Upload screen is the final step in all CloudNine Discovery Portal's workflows. Here you can review your workflow selections, data, and CloudNine Review case (project) you wish to upload to.

- Uploading From: Shows the selected workflow, Concordance, and folder path of the Concordance database and supporting files you are pushing to CloudNine Review.
- Uploading To: The CloudNine Review project you are uploading to and the name of the upload.
- Notes & Comments: Enter any notes and comments about the project.
- Import Notes: Click here to import notes from a text file.
- Start Upload: Starts uploading to CloudNine servers. The Global Monitoring Console screen displays the progress of the upload.
Verify all settings, then click Start Upload to begin uploading to CloudNine. The Global Monitoring Console page provides the upload status. Once uploaded, the Concordance database conversion process will begin. You will receive a series of emails about the progress.