
The CloudNine Analyst to CloudNine Review workflow in CloudNine Discovery Portal provides a simple way to push your responsive data items into CloudNine Review.
Step 1: CloudNine Analyst - CloudNine Review Workflow
Step 2: Selecting the CloudNine Analyst Project and Export
Step 3: Select the CloudNine Review Project
Step 1: Selecting the CloudNine Analyst - CloudNine Review workflow
- Double-click the CloudNine Discovery Portal shortcut to launch CloudNine Discovery Portal. The Welcome (Home) screen appears.
- On the Welcome screen, under Select Data From: left-click to select CloudNine Analyst. When CloudNine Analyst is selected, CloudNine Review is automatically chosen on the right under the Review Data Using: section.
- Click Continue.

- The Login to CloudNine Analyst popup appears. Enter your login username, password, and domain site for CloudNine Analyst then click OK.

- The Login to CloudNine Analyst Duo Authentication popup appears. Select the authentication method established for CloudNine Analysts and complete the login.

- You are now presented with the CloudNine login popup. Enter your login credentials for CloudNine Review, then click Continue.

- The Auth0 Verify Your Identity popup appears, complete the authentication method you have set up for CloudNine Review.

Step 2: Selecting the CloudNine Analyst Project and Export
You have selected the CloudNine Analyst to CloudNine Review workflow and logged in and connected to both CloudNine Analyst and CloudNine Review. The next step is to select the CloudNine Analyst Project and Export the data will come from.
Select the CloudNine Analyst Project and Export
Overview: Select CloudNine Analyst Project and Export

- Search Projects: Used to quickly locate a project. Type in the Search projects... box to locate the project. Searches are fuzzy and will begin returning results based on the letters you type.
- Client: Use the drop-down to select a specific client. The project list is updated to only list projects you have access to for the selected client.
- Search exports: If you know the export name you can use this feature to quickly locate a specific export. Search results are updated as you begin entering characters in the Search exports... option.
- Project: Provides a list of CloudNine Analyst projects you have access to.
- Selected: Indicates the CloudNine Analyst project selected check.
- Export: When a project is selected the Export column will provide a list of all exports for the project.
- Documents: The number of documents for the export.
- Selected: Identifies the selected export with a check.
- Next: Advances you to the next screen, Select the CloudNine Review Case.
Choosing the CloudNine Analyst Project and Export
To send data from CloudNine Analyst to CloudNine Review you will need to select the CloudNine Analyst Project and Export.
- On the Select CloudNine Analyst Export screen, from the left column select the CloudNine Analyst Project the Export is located in.
- Use the Search projects.., or Client drop-down to make it easier to locate the project where the export exists.
- When the project is selected, all exports for the project are listed under the Select CloudNine Analyst export column along with the total number of documents included in the export. Left-click to select the Export you want to send to CloudNine Review.
- Use Search exports... when you have a long list of exports. The search is fuzzy and returns results when you begin typing.
- The Next button becomes available when the CloudNine Analyst Project and Export are selected. Click Next to advance to the Select a CloudNine Review Case screen.
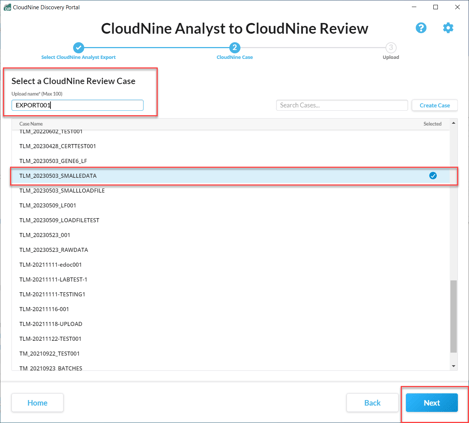
Step 3: Select a CloudNine Review Case
On the Select a CloudNine Review Case screen you will enter an Upload name and select the CloudNine Review case (project) you wish to load the data from CloudNine Analyst to.
Overview

- Upload name: Enter an upload name for reference in CloudNine Review. The upload name should adhere to the naming policies you have implemented.
- Search Cases...: Use to quickly locate the CloudNine Review case (project) you are pushing the data into. The search is fuzzy and will return results as you begin entering characters.
- Create Case: Creates a new case (project) in CloudNine Review. See Create Case.
- Case Name: Provides a list of the CloudNine Review cases (projects) you have admin rights to import data.
- Selected: A check mark indicates the CloudNine Review case (project) selected for import.
- Next: Proceed to the next screen, Confirm & Upload. This option is only available when you have entered an Upload name and selected the Case Name.
Upload to CloudNine Review - Existing Case
👥 You must have Admin rights to load data to an existing CloudNine Review case. If you do not have Admin rights, the CloudNine Review project will not appear in the Case Name list in CloudNine Discovery Portal. 👥
- Enter an Upload name, based on the upload naming policy you have implemented for CloudNine Review. For CloudNine Analyst imports this might mirror the name of your CloudNine Analyst Export.
- Scroll through the Case Name list and left-click to highlight and select the CloudNine Review case (project) the data will be loaded into.
- Use the Search Cases... option to locate the case name you are looking for. The search is fuzzy and updates the list as you type in the search box.
- The Create Case option can be used to create a new case in CloudNine Review.
- Click Next to advance to the Confirm & Upload screen. If the next option is not available, verify you have entered an Upload name and selected the Case Name.
Create a New Case for CloudNine Review
You are able to create a new CloudNine Review case (project) when you are sending data to CloudNine Review using CloudNine Discovery Portal.
Before you create a CloudNine Review case through CloudNine Discovery Portal:
- In CloudNine Review, verify the project (case) does not already exist.
- The project may exist in CloudNine Review, but you may not have the correct access rights to send/load data to it. You must have Admin rights to the CloudNine Review project for it to appear in the CloudNine Discovery Portal Case Name list.
- Verify you have the correct permissions in CloudNine Review to create a new project.
- You must be an Admin or User in CloudNine Review to create a new case (project) through CloudNine Discovery Portal.
- Maintain the Case (project) naming policies you have implemented for CloudNine Review.
- CloudNine Review cases created in CloudNine Discovery Portal are temporary. The case is created when the data is received by CloudNine Review.
- In CloudNine Discovery Portal you should be on the Select a CloudNine Review Case. Click the Create Case
 button at the right. The Create New Case popup appears.
- Enter a Case Name for the CloudNine Review project; based on the naming policy you have for CloudNine Review. The maximum number of characters is 30.
- The default Time Zone is the machine's time zone, if the default selection is incorrect use the drop-down to select the desired Time Zone.
- Click Create. The Create New Case popup closes and you are returned to the Select a CloudNine Review Case screen. The case appears in the Case Name list and is selected. The case is italicized indicating it is only temporary until CloudNine Review receives the data.

- The Upload name has been inputted, the new case is created, appears in the Case Name list, and is selected. Click Next to advance to the Confirm & Upload screen.
📝Remember, the new case is temporary and is not visible in CloudNine Review until data is received. Once the case exists in CloudNine Review you may have to update user permissions to appear on the Project home page.
Step 4: Confirm & Upload
You selected the CloudNine Analyst to CloudNine Review workflow (Step 1) chose the CloudNine Analyst Project and Export (Step 2), Entered an Upload name, and selected or created the case (project) for CloudNine Review (Step 3). You are now on the Confirm & Upload screen.
The Confirm & Upload screen is your last chance to verify the data you are sending to CloudNine Review. 
- Uploading From - CloudNine Analyst: Where the data is coming from (Step 2). Since this is a CloudNine Analyst to CloudNine Review workflow, you should be uploading from CloudNine Analyst. Verify the correct CloudNine Analyst Project and Export are selected.
- Uploading To-CloudNine Review: Identifies the CloudNine Review Case (project) and Upload Name (Step 3). Verify you are sending the data to the correct CloudNine Review case and the Upload Name is right.
- Notes & Comments: Add any information about the data being sent to CloudNine Review.
- Import Notes: If you have made notes in a text editor program such as Notepad, TextPad, UltraEdit, etc you can import the .txt file instead manually entering the information.
- Start Upload: Starts sending the selected data to the CloudNine Review case.
Review the information on the Confirm & Upload screen if changes need to be made you can click the Back option to make changes. When you are satisfied with your selections, click Start Upload. CloudNine Discovery Portal initializes the workflow and takes you to the Global Monitoring Console screen to monitor the upload progress.