
Scope
|
Audience: System Administrators & IT Administrators |
Doc ID: KB-C9R-PU01 |
|
Platform: On-Prem CloudNine Review / Project Updater |
Scope: Backend Infrastructure & Maintenance |
A PDF version of this document can be downloaded here.
Overview
The CloudNine Project Updater is a backend utility for system administrators who need to perform administrative, indexing, maintenance, and troubleshooting workflows outside the primary CloudNine Review web application. Because it operates directly against backend data and project structures, it should be used only when the same task cannot be completed safely through CloudNine Review, Project Maintenance, or the CloudNine Discovery Portal.
While many project maintenance tasks are executed automatically during data ingestion or available within CloudNine Review (Projects Maintenance -> Upgrade), the Project Updater provides direct, fine-grained control for standalone data updates, custom script operations, and environment-level maintenance.
Executive Decision Summary
Use Project Updater only when a backend administrative workflow cannot be completed safely through CloudNine Review, Project Maintenance, or the CloudNine Discovery Portal, and confirm database, storage, and project-scope prerequisites before execution.
High-Risk Workflow Safety Checklist
- Delete Records: Preview targeted records, validate expected counts, confirm BurnBarrelFolder access, and ensure a recovery path exists before deleting.
- Image Backfill and Produced Images: Validate source and target paths, image load file format, identifier fields, and overwrite intent before processing.
- Full Text Indexing: Rename or remove the MultiPartText folder, rebuild Word Lists when text changes, and schedule work during an approved maintenance window.
Key Operational Characteristics
- Service Account Access: Executed under system/service-level credentials on host servers; does not require a standard CloudNine Review user login.
- Direct Backend Operations: Directly alters database indexes and project directory structures without web-tier validation layers.
- Granular Scope: Operations can target the entire project (ALL BATCHES), specific ingestion batches, or targeted records using tag fields.
System Requirements & Prerequisites
| Requirement | Description & Operational Scope |
| Administrative Credentials | Local Administrator privileges on the application host server running Project Updater. |
| Service Account Access | Account permissions granting Read/Write access to project database instances and storage shares. |
| Storage Share Access | Read/Write network share permissions to $C9R staging folders, project data directories ($EDACase), and export/produced image paths. |
| Field Mapping Validation | For field-specific workflows (e.g., Email Indexing, Native Path), ensure required field types (EMAIL, NativePath, etc.) are configured under Project Maintenance → Field info type in CloudNine Review prior to execution. |
Workflow Dependency & Sequencing Map
Certain workflows in Project Updater depend on the output of preceding tasks. Running dependent workflows out of sequence may result in incomplete search indexes or mismatched data relationships.
[ Ingest / Overlay Data ]
│
├───► [ Parent Child Relationship ] ──► [ Family Group Index ]
│
├───► [ OCR / HTML Generation ] ───► [ Word Lists ] ───► [ Full Text Indexing ]
│
└───► [ Metadata / Hash Overlay ] ───► [ De Dup Index ]
Summary of Workflow Dependencies
| Task Performed | Required Next Step | Purpose |
| Parent-Child Relationship | Family Group Index | Propagates updated attachment hierarchy to family groups for search and group tagging. |
| OCR / Text Backfill | Word Lists | Indexes newly extracted text into the project dictionary. |
| Word Lists Update | Full Text Indexing | Rebuilds full-text search indexes using updated dictionary data. |
| Delete Records | De Dup / Word Lists | Purges deleted record entries from duplicate indexes and search dictionaries. |
Quick-Reference Workflow Matrix
| Administrative Needs | Project Updator Workflow | Scope Guidance | Required Follow-Up |
| Refresh email filtering metadata | Email Indexing | ALL BATCHES or specific batch | Confirm EMAIL field mappings if the project is missing. |
| Rebuild native folder tree | Native Path Indexing | ALL BATCHES for rebuild; specific batch for incremental update | Validate NativePath field mapping. |
| Extract searchable text from images | OCR | ALL BATCHES, batch, tag, or DocID | Run Word Lists, then Full Text Indexing. |
| Remove project records | Delete Records | Filter, tag, or custom query | Run De Dup and Word Lists as needed. |
| Repair attachment families | Parent-Child Relationship | ALL BATCHES or specific batch | Run Family Group Index. |
| Refresh search dictionary | Word Lists | ALL BATCHES or specific batch | Run Full Text Indexing when search text changed. |
| Rebuild searchable index | Full Text Indexing | ALL BATCHES or specific batch | Confirm MultiPartText folder handling first. |
| Overlay or reconnect images | Image Backfill or Produced Images | Project-level path and identifier validation | Confirm images display in CloudNine Review. |
Project Updater Log Files
Project Updater log files are stored in the Project folder under $C9R\Logs\ProjectUpdater-<date>.log.
Detailed Workflow Reference
Project Updater Overview
Project Updater is installed locally on your CloudNine Review server under Apps –> ProjectUpdater –> CloudNine.Project.Updater.exe.
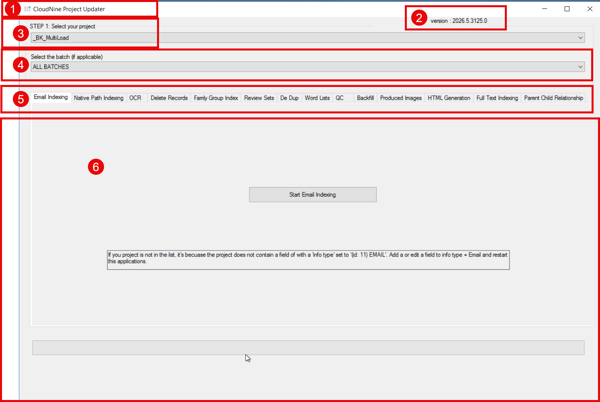
- Application Name.
- Application Version.
- STEP 1: Select your project: You must select the project to which the workflow is performed.
- Select the batch (if applicable): Most of the workflows can be run on the entire project (ALL BATCHES) or a specific batch.
- Workflows: Each tab is a workflow that may be run in Project Updater. Each workflow is run separately.
- Action: The action to take specific to the workflow.
Email Indexing
Email Indexing parses email header metadata to build domain lists and populate fields required for email filtering in CloudNine Review. During project initialization, standard email fields (To, From, CC, BCC) are assigned the EMAIL info type (id: 11). If these default mappings are altered in CloudNine Review (Project Maintenance -> Field info type), Email Indexing must be re-run.
Troubleshooting Note
If a project does not appear in the project drop-down menu, verify that the project contains at least one field configured with info type = EMAIL (ID 11).
Email Indexing Step-by-Step Procedure
Select the Email Indexing tab.
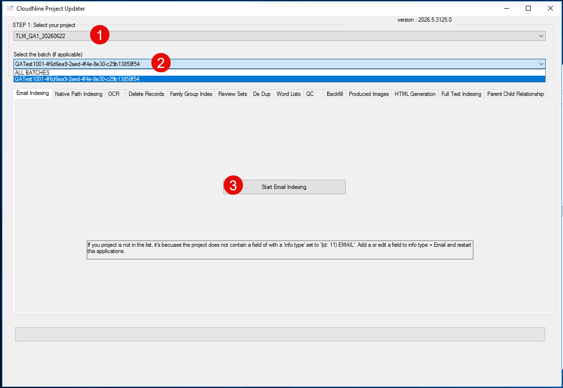
- From the STEP 1: Select your project drop-down menu, select the target project.
- From the Select the batch (if applicable) drop-down menu, choose ALL BATCHES (to process the entire project) or select a specific batch.
- Click Start Email Indexing.
- A confirmation dialog reading Complete will appear once indexing is finished. Click OK.
Native Path Indexing
Native Path Indexing processes the Original Path metadata field to construct the folder hierarchy within the Native Tree View in CloudNine Review. If the native path field assignment is modified (Project Maintenance -> Field info type), Native Path Indexing must be executed to refresh the tree view structure.
Native Path Indexing Step-by-Step Procedure
Select the Native Path Indexing tab.
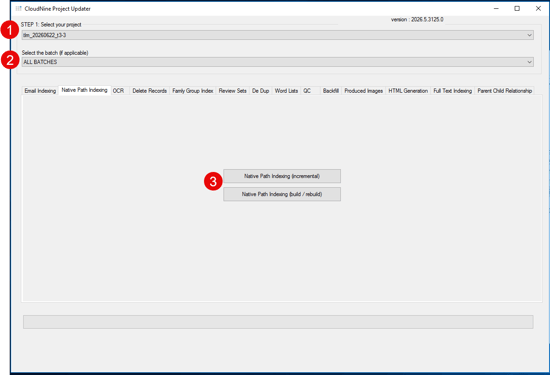
- Select the target project from STEP 1: Select your project.
- From Select the batch (if applicable), choose the scope:
- ALL BATCHES: Required when building or fully rebuilding the folder tree.
- Specific Batch: Used when performing an incremental update for newly added records.
- Click the appropriate action button:
- Native Path Indexing (build / rebuild): Select if ALL BATCHES is active.
- Native Path Indexing (incremental): Select if a specific batch is active.
- A Complete dialog will display upon completion. Click OK.
Optical Character Recognition (OCR)
The OCR workflow extracts text from image-based file formats (TIFF, PDF, JPG, PNG, GIF, BMP) that do not contain native text. OCR can be executed across an entire project, a targeted batch, specific tagged records, or individual documents by DocID.
Step-by-Step Procedure (Batch & Tag-Based OCR)
Select the OCR tab.
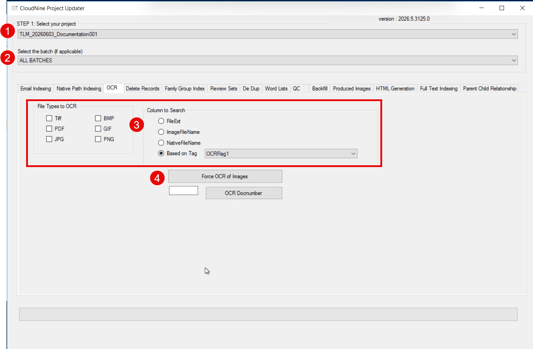
- Select the project under STEP 1: Select your project.
- Specify batch scope via Select the batch (if applicable) (ALL BATCHES or specific batch).
- Configure OCR Specifications using one of two methods:
- Method A (File Type & Field Search): Select target file format checkboxes under File Types to OCR (e.g., PDF, Tiff) and select the file field to evaluate under Column to Search (FileExt, ImageFileName, or NativeFileName).
- Method B (Tag-Based - Recommended): Select Based on Tag and choose the tag field containing True/Yes flags for records requiring OCR.
- Click Force OCR of Images.
- A status pop-up displaying Completed OCR of [X] Images in [ProjectName] will appear. Click OK.
Step-by-Step Procedure (Single Document OCR)
- Select the project under STEP 1: Select your project.
- In the OCR tab, locate the single-document entry section at the bottom.
- Input the target CloudNine DocID into the text field.
- Click OCR Docnumber.
- Click OK on the completion confirmation dialog.
Next Step Recommendation
Following any OCR operation, run Word Lists and Full Text Indexing to incorporate newly generated text into search indexes.
Delete Records
The Delete Records workflow removes document records from a CloudNine Review project database.
CRITICAL WARNING: Burn Barrel Directory
File deletion via Project Updater does not immediately destroy files. Deleted database entries have their corresponding source files moved to the BurnBarrelFolder location defined in the application configuration file (App.config). Verify that BurnBarrelFolder paths are accessible and monitored before running deletion tasks.
Execution Methods
- Use Project Filter: Deletes records currently matching active project filters set in CloudNine Review (Advanced Search -> Filters -> Project Filtering).
- Select Documents By Tag (Recommended): Deletes records where the specified tag field is set to True / Yes. Offers the highest degree of quality control.
- Use Custom Query: Executes a custom SQL WHERE clause against project database tables.
Delete Records Step-by-Step Procedure
Select the Delete Records workflow tab.
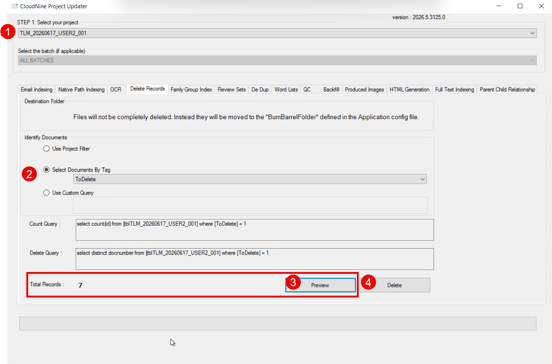
- Select the target project from STEP 1: Select your project.
- Under Identify Documents, select the desired identification method (e.g., Select Documents By Tag) and choose the tag field from the drop-down menu.
- Click Preview. The system will execute the count query and display the target number under Total Records. Verify the Total Records count matches the expected numbers.
- Click Delete.
- Upon completion, a Success pop-up displaying Process completed successfully! will appear. Click OK.
Family Group Index
The Family Group Index builds and maintains the family group identifier (FamilyGroupID) used in CloudNine Review to include document families during searching, review, and group tagging. Rebuilding this index is necessary if processed/produced load files were ingested with missing family metadata or if parent-child relationships have become broken.
Family Group Index Step-by-Step Procedure
Select the Family Group Index tab.
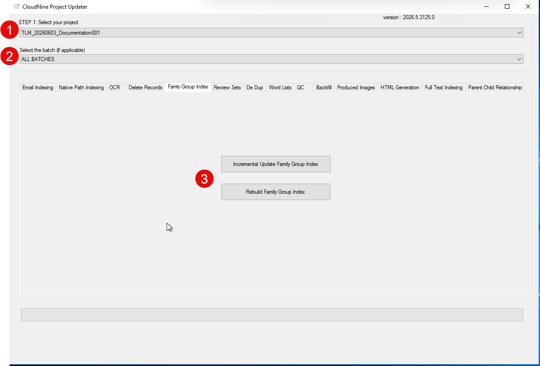
- Select the project under STEP 1: Select your project.
- Select batch scope under Select the batch (if applicable):
- Select ALL BATCHES for project-wide rebuilds.
- Select a specific batch for localized updates.
- Click the appropriate execution button:
- Incremental Update Family Group Index: Use when updating a specific batch following incorrect field mapping.
- Rebuild Family Group Index: Use when rebuilding family structures across the entire project (ALL BATCHES).
- Monitor progress via the status bar at the bottom of the window. Click OK when the completion dialog appears.
Review Sets
The Review Sets tab in Project Updater displays legacy batch creation controls.
Best Practice Note
Do not create or manage Review Sets within CloudNine Project Updater. Always create and assign Review Sets directly within the CloudNine Review interface to preserve audit logging, administrative tracking, and review assignments.
Deduplication (De Dup)
The De Dup workflow updates or rebuilds duplicate hash indexes used for record deduplication across CloudNine Review. While deduplication indexes generate automatically during initial data ingestion, custom hash updates, overlay operations, or changes to duplicate criteria fields require a manual rebuild of the duplicate index.
Rebuild Duplicate Index Step-by-Step Procedure
Select the De Dup workflow tab.
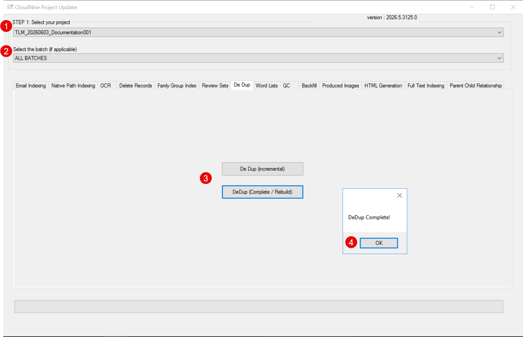
The De Dup workflow updates or rebuilds duplicate hash indexes used for record deduplication across CloudNine Review. While deduplication indexes generate automatically during initial data ingestion, custom hash updates, overlay operations, or changes to duplicate criteria fields require a manual rebuild of the duplicate index.
Word Lists
The Word Lists workflow regenerates the master project dictionary used for full-text search indexing (DTS Index). While dictionary generation is automatic.
lly triggered during batch imports, custom database edits or manual text overlays necessitate rebuilding the word list. Rebuilds can also be initiated inside CloudNine Review (Project Maintenance -> Upgrade).
Rebuild Word Lists Step-by-Step Procedure
Select the Word List workflow tab.
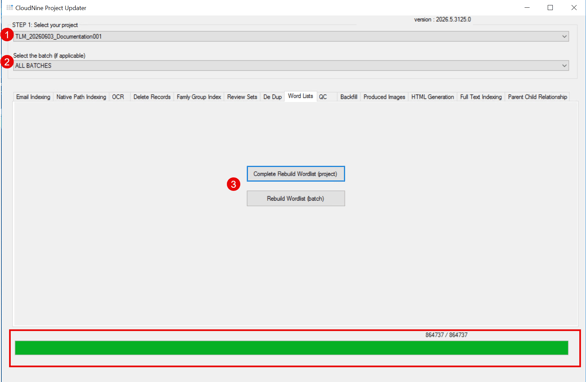
- Select the project under STEP 1: Select your project.
- Select the batch (if applicable), either ALL BATCHES or a specific batch.
- Click the appropriate operation button:
- Complete Rebuild Wordlist (project): Rebuilds dictionary terms across all project batches.
- Rebuild Wordlist (batch): Rebuilds dictionary terms for the selected batch only.
- Click OK on the initial confirmation notification. Track progress using the green progress bar at the bottom of the window. Upon completion, the term counter above the progress bar will reflect total indexed tokens (e.g., 864737 / 864737).
- Click OK on the final notification.
Quality Control
The QC workflow verifies the integrity of the DTS Index (Word List) across all batches within a project to ensure search completeness prior to the launch of review or a production export.
QC Step-by-step Procedure
Select the QC workflow tab.
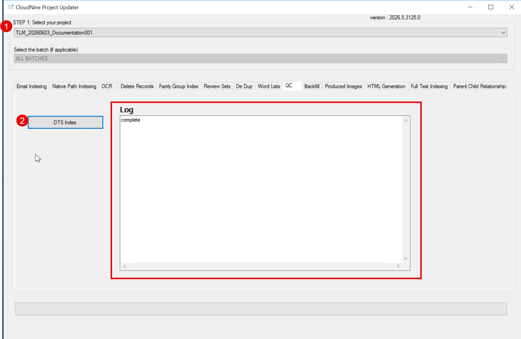
- Select the project under STEP 1: Select your project.
- Click DTS Index.
- Inspect the Log output box:
- Success: Displays complete in the log area.
- Incomplete: Lists specific batch numbers containing unindexed text.
- If unindexed batches are reported, navigate to the Word Lists tab and execute a rebuild for the affected batches.
Image Backfill
The Backfill workflow overlays or replaces document image files in a project using the LFP image load file. This serves as an administrative backend alternative to the CloudNine Discovery Portal image overlay utility.
Requirements
Backfill operations require an LFP (image) load file and a DAT (data) load file. The DAT file must contain the CloudNine DocNumber and the “Bates” (key) field, which exists in both CloudNine Review and the LFP file.
Image Backfill Step-by-Step Procedure
Select the Backfill tab.
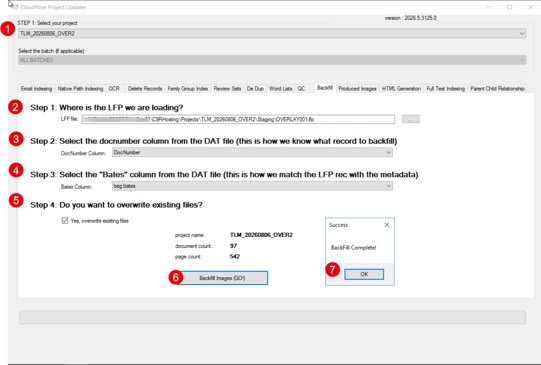
- Select the target project under STEP 1: Select your project. (Note: Backfill scans globally; batch selection is disabled).
- Step 1 (LFP Path): Click ... and select the source .lfp image load file path.
- Step 2 (DocNumber Field): Select the unique CloudNine Review DocNumber from the DAT metadata file.
- Step 3 (Bates Field): Select the Bates identifier column from the DAT file, ie BegBates. This is the “key” field common to both the LFP and DAT load files.
- Step 4 (Overwrite Option): Check Yes, overwrite existing files to replace existing images. Leave unchecked to skip existing images and append new ones only.
- Validation and Go: Review displayed summary metrics (project name, document count, page count). Click Backfill Images (GO!).
- A success Backfill Completed! message displays when processing finishes. Click OK.
Produced Images
When running productions within CloudNine Review, users can select Add produced images back into the project to link produced images directly to record views. If that option was omitted or a network interruption occurred, the Produced Images workflow manually links exported production image sets back to project database records.
Storage Path Setup (Required Pre-Step)
Before executing this workflow in Project Updater, administrators must manually create the target directory structure on the host storage volume and copy exported production images:
- Default Export Source Path: \\<ServerName>\C9RHosting\Projects\<ProjectName>\$Productions\<ExportID>\IMAGES
- Required Target Path: \\<ServerName>\C9RHosting\Projects\<ProjectName>\$ProducedImages\<ExportID>\IMAGES
Produced Images Step-by-Step Procedure
Select the Produced Images workflow tab.
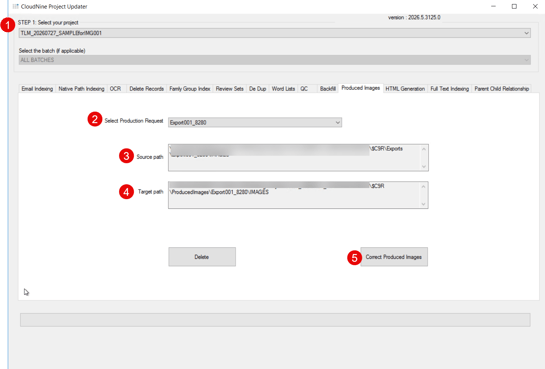
- Select the project under STEP 1: Select your project.
- Select the production identifier from the Select Production Request drop-down menu.
- Select the production identifier from the Select Production Request drop-down menu.
- Ensure images have been copied into the specified Target path directory on disk.
- Click Correct Produced Images.
- Click OK on the Success popup dialog. Produced images will now display within the Production tab in CloudNine Review.
HTML Generation
HTML Generation converts native documents into HTML files that can be viewed in the CloudNine Review HTML tab. While native data loaded via CloudNine Discovery Portal is converted automatically during ingestion, third-party load file imports (e.g., via CloudNine LAW) require manual HTML rendering.
Resource Allocation Guidance
The Number of threads parameter determines the CPU allocation on the host. It is recommended to set the thread count to the total number of physical CPU cores minus 2 (e.g., 4 on a 6-core host) to maintain system responsiveness during background rendering.
HTML Generation Step-by-Step Procedure
Select the HTML Generation tab.
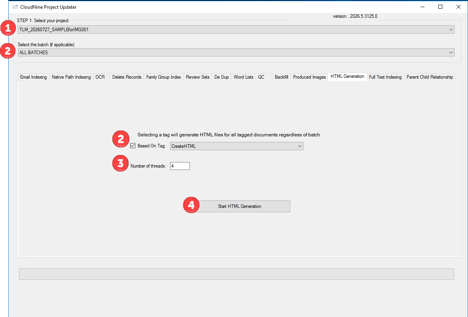
- Select the project under STEP 1: Select your project.
- Select document target scope:
- ALL BATCHES: Processes all native files in the project.
- Select the batch (if applicable): Limits rendering to a designated batch.
- Check Based On Tag and select a tag field (e.g., CreateHTML), flagging specific documents for rendering.
- Input the desired thread allocation into Number of threads.
- Click Start HTML Generation.
- Track progress using the status bar. Click OK when the HTML Generation Complete! popup appears.
Full Text Indexing
Full Text Indexing rebuilds the project's master search index structures.
Critical PRE-STEP: MultiPartText Directory
Before initiating Full Text Indexing, administrators must manually delete or rename the MultiPartText folder located within the project's data directory: \\<ServerName>\<StorageShare>\<ProjectName>\$EDACase\MultiPartText. Failure to remove or rename this folder will cause the indexer to detect existing multipart files and abort the rebuild process.
Full Text Step-by-Step Procedure
Once you have renamed or deleted the MultiPart Text folder, open Project Updater and select the Full Text Indexing workflow.
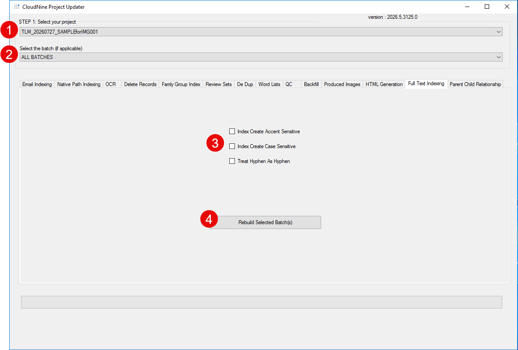
- Select the project under STEP 1: Select your project.
- Select batch scope (ALL BATCHES or specific batch).
- (Optional) Configure advanced search index checkboxes:
- Index Create Accent Sensitive
- Index Create Case Sensitive
- Treat Hyphen As Hyphen
- Click Rebuild Selected Batch(s).
- Monitor progress via the progress bar. Click OK upon completion.
Parent-Child Relationship
The Parent-Child Relationship workflow builds or updates family attachment links within the project database. Native uploads establish parent-child links automatically during processing. Load file imports build relationships based on mapped fields (such as BegAttached or AttachParent).
Execute this workflow if attachment fields were missing during initial ingestion, if fields were mapped incorrectly, or if family structures are broken.
Parent-Child Relationship Step-by-Step Procedure
Select the Parent-Child Relationship workflow tab.
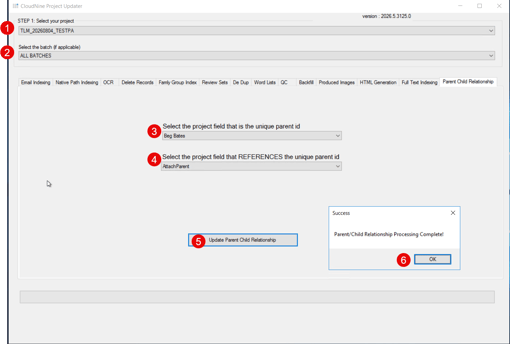
- Select the project under STEP 1: Select your project.
- Select scope under Select the batch (if applicable).
- From Select the project field that is the unique parent id, choose the parent key field (e.g., Control ID, DocID, BegDoc).
- From Select the project field that REFERENCES the unique parent id, choose the field referencing the parent key (e.g., AttachParent).
Field Logic Note
Ensure the reference field is populated only on child/attachment records. If populated on parent records, the parent will be classified as both a parent and an attachment.
- Click Update Parent Child Relationship.
- Click OK when the Parent/Child Relationship Processing Complete! dialog displays.
- Required Next Step: Return to the Family Group Index tab and execute a Rebuild Family Group Index to propagate updated relationships to project search indexes.