
About CloudNine's Cloud Connector
CloudNine’s Cloud Connector provides a secure path for transferring approved Microsoft Purview eDiscovery export data into CloudNine Review. The connector reduces reliance on manual export handling by allowing approved Purview exports to be ingested into the review platform.
This guide explains the configuration process: first, registering and permissioning the application in Microsoft Entra ID; second, registering and permissioning the service principal for Purview access; third, granting the appropriate Purview roles and case access; and fourth, adding the resulting connection details in CloudNine Review so the connector can collect approved data.
Downloadable Version: CloudConnector_ThirdPartySetupandConfiguration_Purview
Before you Begin
Ensure the following prerequisites are met before starting configuration.
Microsoft Requirements
- Microsoft Purview eDiscovery licensing is enabled for the tenant.
- A Microsoft Entra ID Global Administrator or Cloud Application Administrator is available to register an application and grant administrator consent.
- A Microsoft Purview administrator has permission to manage role groups and eDiscovery access.
CloudNine Requirements
- You have CloudNine Review Global Administrator permission.
- You can access the Connectors administration area within CloudNine Review.
Information to Capture
During setup, record the following values:
- Application (Client) ID
- Directory (Tenant) ID
- Client Secret Value
- Enterprise Application Object ID
You will need these values to configure the connector in CloudNine Review.
Helpful Microsoft Resources
- Register an Application: The foundational guide for creating an app identity in Entra ID.
- Configure API Permissions: Detailed steps on how to add and authorize permissions for your registered app.
- Add a Redirect URI: A security feature for Microsoft Entra ID authentication, sent to the intended recipient.
- Microsoft Graph Permissions Reference: A complete list of all scopes for emails (Mail.*) and files (Files.*).
- Granting Admin Consent: Instructions for administrators to approve high-privilege permissions tenant-wide.
- Restrict App To Users: Provides information on restricting users who can access the app.
- Permissions in Microsoft Purview portal: Management of permissions for users performing tasks in Microsoft Purview.
Step 1: Register the Application in Microsoft Entra ID
Cloud Connector authenticates to Microsoft 365 through a dedicated application registration. This application establishes a secure trust relationship between your Microsoft environment and CloudNine Review.
Create the Application
- Sign in to the Microsoft Entra Admin Center.
- Navigate to Identity-> Applications-> App registrations.
- Select New Registration.
- Enter the following configuration:
- Name: CloudNine Cloud Connector Purview Ingestion.
- Supported Account Types: Accounts in this organizational directory only (Single tenant).
- Click Register.
- Copy and Save the following; you will use these values later when creating the Cloud Connector.
- Application (Client) ID.
- Directory (Tenant) ID.
Step 2: Create a Client Secret
Cloud Connector uses a client secret to securely authenticate with Microsoft services.
- Open the application registration.
- Select Certificates & secrets.
- Select New Client Secret.
- Enter a description and expiration period.
- Create the secret.
Important: Microsoft displays the secret value only once. Copy and securely store the secret immediately. Once you leave the page, you cannot view the value again.
Managing Secret Expiration
To avoid service interruptions:
- Monitor secret expiration dates.
- Create a replacement secret before the existing secret expires.
- Update the Cloud Connector configuration with the new secret value.
Step 3: Add a Redirect URI (required)
A Redirect URI is required for the application authentication flow used by the CloudNine Discovery Portal and Cloud Connector.
- Select Authentication.
- Choose Add a platform.
- Select Mobile and Desktop Applications.
- Enter http://localhost:5000.
- Select Configure.
Step 4: Assign API Permissions
Cloud Connector requires access to Microsoft Graph and Microsoft Purview APIs to discover and collect approved eDiscovery content.
- Navigate to API Permissions -> Add a permission.
- Select Microsoft Graph, then choose Application Permissions.
- Add the following permissions:
| API / Permission name | Type | Description and Purpose |
Admin consent required |
Why Admin Consent is/isn’t needed |
| Microsoft Graph | ||||
| eDiscovery.Read.All | Delegated |
Description: Read all eDiscovery objects. Purpose: * Required for the current UI workflow. * Allows the application to display eDiscovery cases and exports that the signed-in user is already authorized to access in Microsoft Purview. * It does not grant the user access to additional cases or bypass existing Purview roles or case membership. * Microsoft does not currently provide a narrower delegated eDiscovery permission for the case/export listing APIs used by the application. |
Yes | * Microsoft requires administrator approval because eDiscovery is a protected compliance API. * Admin consent authorizes the application to use this API on behalf of signed-in users; it does not give those users tenant-wide eDiscovery access. * Existing Purview permissions continue to determine what each user can see. |
| eDiscovery.Read.All | Application |
Description: Read all eDiscovery objects. Purpose: * Required only with the current backend design. * Allows the backend to retrieve export metadata and download URLs without depending on the user's interactive session. * This permission can potentially be removed if export metadata/download URLs are retrieved by the frontend using the user's delegated access and then securely handed to the backend. |
Yes | * Application permission allows the backend service to access eDiscovery data without a signed-in user. * Microsoft requires administrator consent when access is unattended. |
| offline_access (optional) | Delegated |
Description: Maintain access to data you have given it access to. Purpose: * Recommended for smoother user experience, not required for the initial login or eDiscovery access. * Allows the application to obtain refresh capability so the user can remain signed in and delegated access can be renewed without repeated interactive authentication. * It can be omitted if persistent/renewable sessions are not required. |
No | * It allows the user to continue access they have already authorized. * It does not independently grant additional eDiscovery privileges. |
| openid | Delegated |
Description: Sign users in. Purpose: * Required for interactive OpenID Connect sign-in. * Allows users to authenticate to the application with their organizational Microsoft account and enables issuance of an ID token. |
No | This is a standard identity/sign-in scope and does not grant access to organizational eDiscovery content. |
| profile | Delegated |
Description: View users’ basic profile. Purpose: * Recommended, not strictly required for eDiscovery access. * Provides standard signed-in-user information such as display name and other basic profile claims. * Omit it if the application does not need those additional profile claims. |
No | This provides standard profile information associated with the authenticated user and does not grant broader organizational access. |
| MicrosoftPurviewEDiscovery | ||||
| eDiscovery.Download.Read | Application |
Description: Allows the application to download eDiscovery export packages. Purpose: * Required for backend export downloading. * Allows the backend service to download an eDiscovery export package that has already been created and selected. * It does not grant permission to create searches, modify cases, place holds, purge content, or otherwise administer eDiscovery. |
Yes | The backend performs this operation without an interactive user, so Microsoft requires administrator approval for the application permission. |
Grant Administrator Consent
After permissions have been assigned:
- Select Grant Admin Consent.
- Confirm the request.
- Verify all required permissions display a status of Granted.
Step 5: Grant Microsoft Entra ID App Access to Purview
Microsoft requires the backend application service principal to be registered with Microsoft Purview and assigned to an appropriate eDiscovery role group before it can use app-only eDiscovery access.
Before running the PowerShell commands, confirm that the Exchange Online PowerShell module is installed and that the administrator can connect to Security and Compliance PowerShell.
Follow these steps to grant the Entra ID application access to Purview.
1. Connect to Microsoft Security & Compliance PowerShell: Run:
Connect-IPPSSession
Sign in using an account authorized to manage Microsoft Purview role groups.
2. Register the application's service principal with Microsoft Purview:
IMPORTANT: Enterprise Application Object ID
Two identifiers are required during configuration:
-
- Application (Client) ID
- Enterprise Application Object ID
The Object ID must come from:
-
- Microsoft Entra ID → Enterprise applications [Application] → Object ID.
Do not use the Object ID shown under:
-
-
Microsoft Entra ID → App registrations
-
Although these objects represent the same application, they have different Object IDs. Microsoft Purview requires the Enterprise Application Object ID.
Run:
New-ServicePrincipal `
-AppId "<APPLICATION-CLIENT-ID>" `
-ObjectId "<ENTERPRISE-APPLICATION-OBJECT-ID>" `
-DisplayName "<APPLICATION-NAME>"
Example:
New-ServicePrincipal `
-AppId "xxxxxxxx-xxxx-xxxx-xxxx-xxxxxxxxxxxx" `
-ObjectId "yyyyyyyy-yyyy-yyyy-yyyy-yyyyyyyyyyyy" `
-DisplayName "Company Purview Export Application"
This step registers a reference to the existing Entra Enterprise Application with Microsoft Purview. It does not create another Entra application and does not itself grant eDiscovery access.
3. Verify the service principal registration: Run:Get-ServicePrincipal `
-Identity "<APPLICATION-CLIENT-ID>" |
Format-List DisplayName,AppId,ObjectId
Verify:
AppId: Matches the Entra Application (Client) ID, and:
ObjectId: Matches the Enterprise Application Object ID.
4. Assign the minimum Purview role: Run:Add-RoleGroupMember `
-Identity "eDiscoveryManager" `
-Member "<ENTERPRISE-APPLICATION-OBJECT-ID>"
This assigns the application's service principal to the Microsoft Purview eDiscovery Manager role group.
5. Verify the assignment: Run:
Get-RoleGroupMember `
-Identity "eDiscoveryManager"
Confirm that the application appears in the returned membership.
Step 6: Assign Microsoft Purview Roles and Permissions
API permissions determine what the application can request. Microsoft Purview roles determine what content the application can access and manage.
Role Groups Overview
Add the service principal or authorized user to the appropriate Microsoft Purview role group based on the level of access required:
In the Microsoft Purview Portal, go to Settings -> Roles and Scopes -> Role Groups.
- eDiscovery Manager: Appropriate for scoped access. Members can create and manage their own cases and access cases where they are explicitly added.
- eDiscovery Administrator: Appropriate for tenant-wide eDiscovery administration. Members can access and manage all cases across the organization.
- Compliance Administrator or Organization Management: May provide broader compliance administration capabilities but should be assigned only when required by the organization’s access model.
Step 7: Grant Access to eDiscovery Cases
Role-group membership and case membership work together. Role groups determine whether the user or service principal has the required eDiscovery capabilities, while case access determines which cases and exports are available for the connector workflow.
For case-scoped workflows, add the user or role group that will initiate the connector workflow to the relevant eDiscovery case. This step helps ensure the connector can access only the cases and data that the organization has approved.
- Sign in to the Microsoft Purview portal with an account that has Case Management permissions (or as an eDiscovery Administrator).
- In the navigation panel, go to eDiscovery -> Cases.
- Select the case you want to modify.
- Open Case settings tab, then select Access and permissions.
- Select Add User.
- Select the user(s) or role group(s) you wish to add.
- Select Add to confirm. Save your changes.
Step 8: Create the Connector in CloudNine Review
Once Microsoft configuration is complete, create the Cloud Connector within CloudNine Review.
- Sign in to CloudNine Review as a Global Administrator.
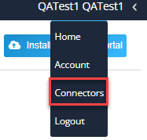
- On the My Projects page, open the User menu in the top-right corner and select Connectors.
- Select Create New.
- Enter the following values:
- Connector Name: Enter a unique descriptive name. This might be as simple as Purview Connector, or you may choose to name it after the eDiscovery Collection.
- Connection Type: Purview.
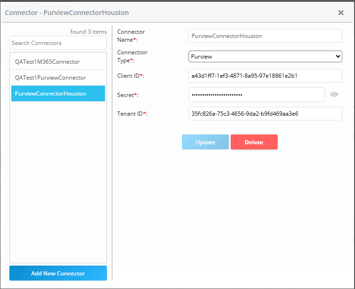
- Client ID: Application (client) ID.
- Secret: Client Secret Value.
- Tenant ID: Directory (Tenant) ID.
- Select Create New.
The connector will appear in the Connectors list and will be available for authorized users to select when initiating approved Purview collection workflows.
Verify the Configuration: Validation Checklist
Before performing a production collection, CloudNine recommends validating the configuration by confirming that the connector can:
- Authenticate successfully.
- Connect to Microsoft Purview.
- Display authorized eDiscovery cases.
- Access approved mailboxes and data locations.
- Complete a small test collection without errors.
Security Best Practices
CloudNine recommends the following security controls:
- Follow least-privilege access principles.
- Review API permissions regularly.
- Rotate client secrets according to organizational policy.
- Limit connector administration access to authorized personnel.
- Use separate connectors when different matters, departments, or regions require distinct security boundaries.