
There are various methods of how modern data is collected and how you receive the data. You may receive the data in a collected image format such as UFDR, or you may receive data in a load file format such as a .CSV or .DAT file. How the data is received will determine how the data is loaded into CloudNine Analyst.
Review the data you have received to determine how you will import your data. The table below shows the Data File Format and Import Method. If you have UFDR or Slack JSON files, click the links in the table to learn how to import using CloudNine Discovery Portal.
|
Data File Format |
Import Method |
| UFDR | CloudNine Discovery Portal |
| Slack JSON | CloudNine Discovery Portal |
| Load File (CSV, Pipe, Tab, or DAT) |
CloudNine Analyst – Direct Import |
|
Supporting Attachments for Communication, Social Media, and Computer Activity types |
CloudNine Analyst – Direct Import |
If you prefer, the CloudNine Services Team can load your data into CloudNine Analyst. Fees may be charged based on the negotiated contract rate
Review Your Data
Navigate to the location of your data and review the files you received. If you received a UFDR file or Slack JSON file, use the links in the table above to learn how to import using CloudNine Discovery Portal.
If the data is provided in a delimited text format, open the file in a text editor program to determine the delimiters and identify the Import Type. There are five classifications of data types: Communication, Financial, Geolocation, Social Media, and Transactions.
Below is a sample of load file data you might receive. In this sample, there are CSV load files for each data type as well as folders for ATTACHMENTS and Support Files.

Importing Load Files and Attachments into CloudNine Analyst
When data is received in load file format, you can import the metadata by mapping it to fields specific to the type of data received. If the data has attachments, you will select the attachment folder when setting up the import. Attachments may exist for Communications, Social Media, and Computer Activity.
Before you Import
Before you import, you will need to:
Create or Open a Project
- Log in to your CloudNine Analyst site.
- On the Client Dashboard select a Project from the List or choose Add Project to create a project.

- If Add Project is selected the New Project page opens. Enter a PROJECT NAME (Required) and optional INTERNAL PROJECT CODE OR MATTER IDENTIFIER, PROJECT TIMEZONE and PROJECT SUMMARY. Click SAVE to save the new project.

- The new project has been added to the Active Projects List. Select the Project Name from the list to open the Project page.
New Project

Existing Project

Create an Evidence Container
An Evidence Container must exist to import the data to. You can manually add Evidence or import an Evidence list. This article provides basic information about creating an evidence container. If you already have evidence containers, you will select the Evidence Container on the Import Metadata Project Options page.
Manually Add Evidence
- Select Evidence from the horizontal menu bar or on the right fly-out menu select Project Items - Evidence.

- On the Project Items: Evidence List page, click Add Evidence. The Adding Evidence Metadata page opens.
- Enter an EVIDENCE NAME (required) and any other data you want to track about the evidence. Once complete click SAVE.

- Click back to project under Links to return to the Project page.
Import a Load File
Now that you have a Project and Evidence container, you can import the load file, adding data and attachments to the project. Modern Data has five classifications: Communications, Computer Activity, Geolocation Data, Social Media Activity, and Transactions. Communication is one of the most common forms of modern data and includes Chats, SMS, MMS, Calls, Groups, Text Messages, and Emails.
Import Modern Data with Attachments
Three modern data types support the direct import of attachments: Communications, Social Media, and Computer Activity. For this article, Communications Metadata with Attachments will be imported.
Communication Load File Import
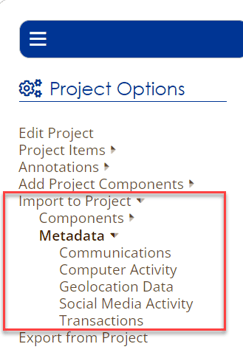
Expand the right fly-out menu, under the Project Options section, expand Import to Project, then Metadata. Under Metadata there are five Modern Data options, select Communications.
The Project Items: Import Communication page launches. Here you will select import options specific to Communication data. This article discusses default options only. More detailed information about load file import options can be found here.
There are three screens for the import process.
Upload Attachments, Verify Settings
Project Items: Import Communication - Page 1: Import Settings

- Enter an IMPORT NAME (Required). The Import Name is used for identification, tracking, and filtering. It may be the name of the metadata file, custodian, date of import, etc.
- IMPORT TYPE (Required): Select THESE ARE NEW RECORDS TO BE ADDED TO THE MATTER: Data is added as new records to the project.
- CONTROL NUMBERING (Required): Select CONTROL NUMBERS ARE INCLUDED AS A COLUMN IN THE LOAD FILE. The load file contains a column with a unique identifier that will be used as the Control Number.
- COMMUNICATION TYPE: Choose the COMMUNICATION TYPE, email, chat, sms, mms, call, group, or mixed. If mixed is selected, you MUST have a column in the load file that specifies the Communication Type. For this example, there is a field in the load file, COMMUNICATION_TYPE so mixed is selected.
- ISOLATE THREADS: Select DO NOT ISOLATE CHAT THREADS WITHIN THIS IMPORT. This will allow threading to span across multiple imports.
- DEDUPLICATION: Select the DEDUPLICATION method. DO NOT DEDUPLICATE is the default.
- TIMEZONE: CloudNine Analyst standardizes all timestamps for searching to UTC. To ensure the adjustment is correct, enter the original timezone of the metadata you are importing. In this case, America/Chicago is entered. If the timezone is not entered, CloudNine Analyst will use the timezone set for the project.
- EVIDENCE CONTAINER (Required): Select the Evidence Container from the drop-down list.
- AUTOMATICALLY MAP FIELDS: Selected by default, this will make all attempts to map load file fields to fields in the CloudNine Analyst project.
- UPLOAD LOAD FILE: DRAG/DROP or BROWSE to the metadata file you wish to upload. Only one file can be selected at a time. Once selected, the file name appears.

- Select the upload DELIMITER. In this case, the comma is selected.
- NOTES: Add any optional notes about the Import.
Import Communications Metadata – Page 2: Mapping the Metadata Fields
On the first screen of the Import Metadata, you entered an Import Name, chose Import as New Data, selected the Communication Type, additional import options, selected Automatically Map the Metadata, and selected the Load file and delimiters for import. You are now on the second screen of the Import Metadata where you will map metadata fields.

- REQUIRED FIELDS: The first category of Metadata fields. To import metadata these fields must be populated, regardless of the Modern Data type, to create a record in the CloudNine Analyst project.
- OPTIONAL FIELDS: If data exists, these are additional fields for the Modern Data type that may be populated if they exist in the load file.
- ESI ANALYST FIELD: The Field Name as it exists in CloudNine Analyst.
- LOAD FILE COLUMN ASSIGNMENT: Field names that exist in the selected load file. If AUTOMATICALLY MAP FIELDS is selected, CloudNine Analyst attempts to map the fields from the load file. The drop-down can be used to review and select available fields.
- BACK: Moves you to the previous page.
- NEXT: Moves you to the next page.
On the first page, the Automatically Map Fields option was selected. Compare the ESI ANALYST FIELDS to the selected LOAD FILE COLUMN ASSIGNMENT field to verify the correct field(s) are selected. If any field has SKIP selected CloudNine Analyst did not identify a matching field in the load file. Use the drop-down list to determine if there is a field it can be mapped to.
Review and make any necessary changes by selecting field names from the load file drop-down list that best fits the CloudNine Analyst field. After you reviewed and made any necessary changes to the selected fields, click NEXT to advance to the 3RD screen of the import process.
Import Communications Metadata – Page 3: UPLOAD ATTACHMENTS, verify IMPORT SETTINGS, verify FIELD MAPPING
On the third and final screen, you will select any attachments to upload, verify the import settings, and verify the field mapping.

-
UPLOAD ATTACHMENTS (Optional), click SELECT FOLDER to browse to the folder where the attachments reside. Or use the drag/drop feature to drag and drop Attachments. Once selected, a message displays the number of attachments to upload.

-
Click Upload, to approve uploading files to the site. The number of files selected will appear. You can verify the path location of the files by hovering your mouse over the selected files.
Note: Load File data may be imported without attachments.
-
- IMPORT SETTINGS: Review the option settings selected on the first page. If correct, move to the next section.
- FIELD MAPPING: Verify the CloudNine Analyst Field Names to the selected Load File Fields.
- Click BACK if any settings or metadata need to be changed.
- If you are satisfied with the Attachment selection, Import Settings, and Field Mapping click BEGIN IMPORT to start the import process.
The Import Initializes and a message appears that attachments are being uploaded. Select the Click Here option on the page to continue using CloudNine Analyst while the upload is in progress.

You will receive email notifications when the Import of Data and Attachment upload are complete. You can also monitor the Import process on the Import page in CloudNine Analyst.
Monitoring / Reviewing Import Information
The Import page provides a list of all imports for the project and the current status of each import.
- On the Project home page, from the horizontal menu at the top of the page, select imports. The Project Items: Import list page opens.

- Here you can see the IMPORT DATE, IMPORT TITLE, TYPE, CONTROL_START, CONTROL_END, STATUS, and DELETE. Hover over the status to determine the state of the import. The gear symbol indicates the import is processing, the flag indicates it is ready. A caution symbol indicates the import was deleted.

- Under IMPORT TITLE, click the Title link to view Import information and log files.
