
A downloadable version of this article is available here.
About CloudNine’s Cloud Connector
CloudNine’s Cloud Connector automates the extraction and upload of Microsoft 365 and Microsoft Purview data directly into CloudNine Review. By eliminating PST creation and manual downloads, it streamlines transfer while improving speed and security. This guide is intended for users who have already configured the required Microsoft Entra ID app registration and CloudNine Review connector.
Prerequisites
- A registered application in Microsoft Entra ID with Microsoft Graph API permissions
- A connector configured in CloudNine Review
- CloudNine Discovery Portal downloaded and installed locally
- Download CloudNine Discovery Portal from https://install.ediscovery.co/
CloudNine Discovery Portal
CloudNine's Discovery Portal bridges Cloud Connector and CloudNine Review, providing the essential configuration for seamless data uploads. This guide covers the specific steps required to establish your connection and initialize the transfer process.
Step 1: Welcome to CloudNine Discovery Portal
When you open CloudNine Discovery Portal, the Welcome to CloudNine Discovery Portal screen appears. Use this screen to select the source and destination for your data transfer before signing in and choosing the appropriate connector.

- Under Select Data From, select Cloud Connector.
- Under Review Data Using, confirm that CloudNine Review is selected.
- Select Continue.
- Enter your CloudNine Review email address and password, then complete two-factor authentication if prompted.
- When prompted to choose the cloud data type, select Microsoft 365 or eDiscovery Purview Export.
- Under Select Connection, choose the connector that matches the selected data type, then select OK.
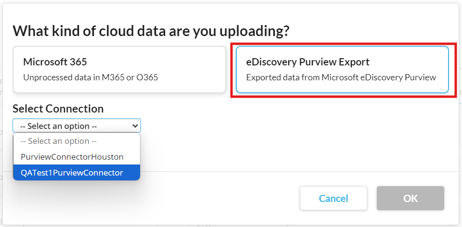
Note: Connectors are configured in CloudNine Review. Before you begin, make sure at least one connector is available for each supported data type you plan to use, including Microsoft 365 and Microsoft Purview eDiscovery export. You can configure multiple connectors for the same data type to support administrative or access-control requirements.
- You will now sign in to Microsoft. Enter the Microsoft login credentials linked to the Registered App set up in Microsoft Entra ID for the third-party connection.

Step 2: Cloud Connector to Review – CloudNine Case
After you sign in and select the appropriate cloud data type and connector, the Cloud Connector to Review: Select a CloudNine Review Case screen appears. On this screen, you name the upload and choose the CloudNine Review case that will receive the data.

- In Upload name, enter a descriptive name for the transfer.
- From the Case Name list, select the existing CloudNine Review case that should receive the uploaded data.
- If you need to create a new case, select Create Case, enter the Case Name, choose the appropriate Time Zone, and then select Create.
- The new case appears in italics in the Case Name list and is selected by default. It is created in CloudNine Review after the upload completes.
- Select Next to continue.
Step 3: Cloud Connector to Review – Configure Connector
On the Configure Connector screen, select the data you want to collect and define the settings for the transfer. The options on this screen depend on the cloud data type you selected in Step 1. Follow the instructions for the applicable workflow below.
Microsoft 365
The following configuration options are available when using data from Microsoft 365.

- Under Select/Create Custodian, choose whether CloudNine Review should populate the custodian field by Name or Custodian ID.
- Under Collection Options, select the data types to upload, such as calendar items, email, and OneDrive content.
- If needed, use Filter by Date to enter a start and end date for email and calendar items.
- If applicable, use Password List to browse to a text file containing known passwords for the selected accounts, with one password per line.
- Under Select the accounts, choose the Microsoft 365 accounts you want to collect and upload.
- Select Next to review the upload settings.
Microsoft Purview eDiscovery export
The following settings are specific to exported data from Microsoft Purview.

- Under Select/Create Custodian, choose an existing custodian or select Create New and enter a custodian name.
- Under Password List, select Browse to choose a text file containing known passwords for the imported data, with one password on each line.
- Under Select One Purview Export, review the available Microsoft Purview exports, then select the export you want to import into CloudNine Review.
- Select Next to continue to the Confirm & Upload screen.
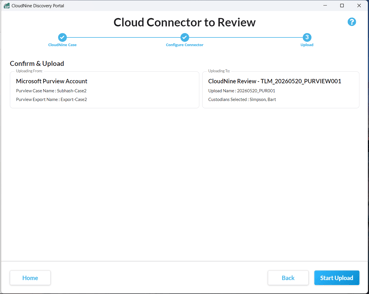
Step 4: Cloud Connector to Review - Upload
On the Confirm & Upload screen, review the selected data source, transfer settings, and destination case before starting the upload. If you need to make changes, select Back to return to the previous screen. When you are ready to begin the transfer, select Start Upload.
The Confirm & Upload screen varies depending on the selected data source. For Microsoft 365, the screen also displays the selected custodians.
Microsoft 365

Microsoft Purview eDiscovery export
Monitoring the Upload Progress
After the upload begins, you can track progress in CloudNine Discovery Portal and CloudNine Review.
Global Monitoring Console
In CloudNine Discovery Portal, the Global Monitoring Console displays status after the connection to Microsoft 365 or Microsoft Purview is established. For Microsoft 365 uploads, each selected account appears as a separate card in Card View. For Microsoft Purview uploads, only one export can be selected, so only one card appears. A green checkmark indicates that the connection is established and the data transfer to CloudNine Review is in progress.

CloudNine Review – Discovery Queue
After the transfer starts, sign in to CloudNine Review to monitor progress through Org Discovery Queue or My Discovery Queue.
To open a Discovery Queue:
- On the My Projects page, open the Training & Support menu.
- My Discovery Queue: Monitor uploads and processes that you initiated.
- Org Discovery Queue: If you are a CloudNine Review global admin, monitor uploads and other processes across all projects.

You can begin reviewing data in CloudNine Review as soon as one of the selected accounts shows Finished in the Status column.